Hookable Events
Hookable Events allow you to define specific events in the system that can trigger automated actions.
Overview
Hookable Events are particularly valuable for capturing events from JavaScript SDK implementations, microsites, or external apps, and setting up automatic responses when those events occur.
This feature was developed to address the increased flexibility in the next-gen platform, where data schemas are dynamic rather than fixed. Since the platform no longer enforces a rigid schema, it needs guidance from users about which events should be monitored for triggering actions.
Key Concepts
- Events: Activities that occur within the system, such as a contact reaching a point threshold or completing a form
- Hookable Events: User-defined events that the system will monitor for triggering actions
- Triggers: Rules that activate when specified events occur
- Actions: Tasks performed when a trigger is activated (sending SMS, emails, etc.)
Setting Up Hookable Events
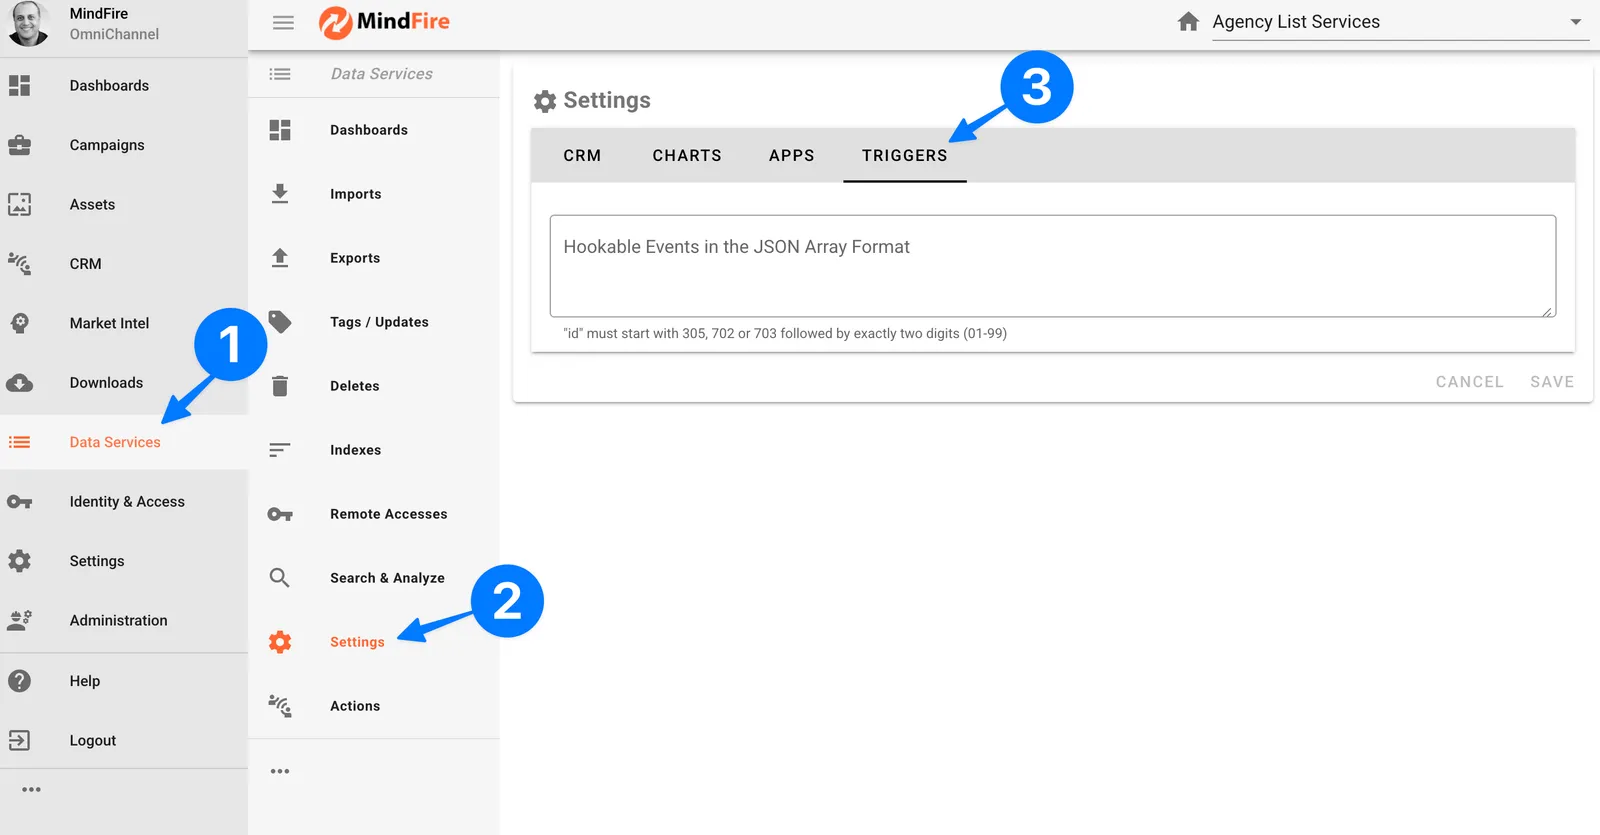
- Navigate to Data Services > Settings > Triggers
- Define your event(s) in a JSON array format with the following fields:
- id: Select the source of the event. The value for "id" must start with 305, 702, or 703 followed by exactly two digits (01-99)
- label: Enter a descriptive name for the event (e.g., "Contact Submitted Application")
- Click Save to register this as a hookable event
The example below shows how an online store owner can define hookable events for "Add to cart" and "Purchase" events. In this example, the JS SDK can be used on the online store to push these events to Data Services when a customer puts an item in their cart or when they complete a purchase.
[
    {"id": "30551", "label": "Add to cart"},
    {"id": "30552", "label": "Purchase"}
]
Now, the online store owner can configure a Trigger to fire an Action when any of these events happen. For example, the owner can configure a trigger to send a Thank You email when a Purchase event is registered.
Creating Triggers Using Hookable Events
Once you've defined hookable events, you can create triggers that respond to these events:
- Go to Triggers section
- Click New Trigger
- Provide a name for your trigger
- In the Settings tab, select your hookable event from the dropdown
- Add conditions if needed (e.g., only trigger if contact is from a specific city)
- In the Action tab, select which actions should be performed when the trigger activates
- Save your trigger
Now, whenever the specified event occurs in your system, the associated trigger will fire and execute the defined actions.
Use Cases
- Customer Engagement: Send congratulatory SMS when a contact reaches a point threshold
- Sales Team Alerts: Notify sales team via email when high-value leads take specific actions
- Cross-system Integration: Trigger actions in external systems when specific events occur
- Automated Workflows: Create complex workflows where events in one system trigger actions in another
Event Types
Different event sources use specific type prefixes:
- 305: JavaScript SDK events
- 702: Integration apps without UI
- 703: Apps with UI (external apps)
The system validates that you use the correct prefix for each source type.
Technical Notes
- Custom events must use the correct type prefix (e.g., 305 for JavaScript SDK)
- Internal app events are predefined by the engineering team
- External app events can be defined by users
- Debug mode can be enabled for testing in the staging environment
Difference from Previous Studio Version
In the previous Studio version, schemas were fixed and predefined. The next-gen platform is more flexible, allowing custom data structures but requiring explicit definition of which events should be monitored.
Related Features
- Actions: Define what happens when triggers fire
- External Apps: Register third-party applications for integration
- JavaScript SDK: Capture events from external websites