Informed Delivery Integration with Personalized URLs
USPS's Informed Delivery® service offers direct mail marketers a powerful opportunity to enhance their campaigns with coordinated digital touchpoints. This guide walks you through the process of integrating MindFire with Informed Delivery campaigns to create personalized, engaging experiences for each recipient.
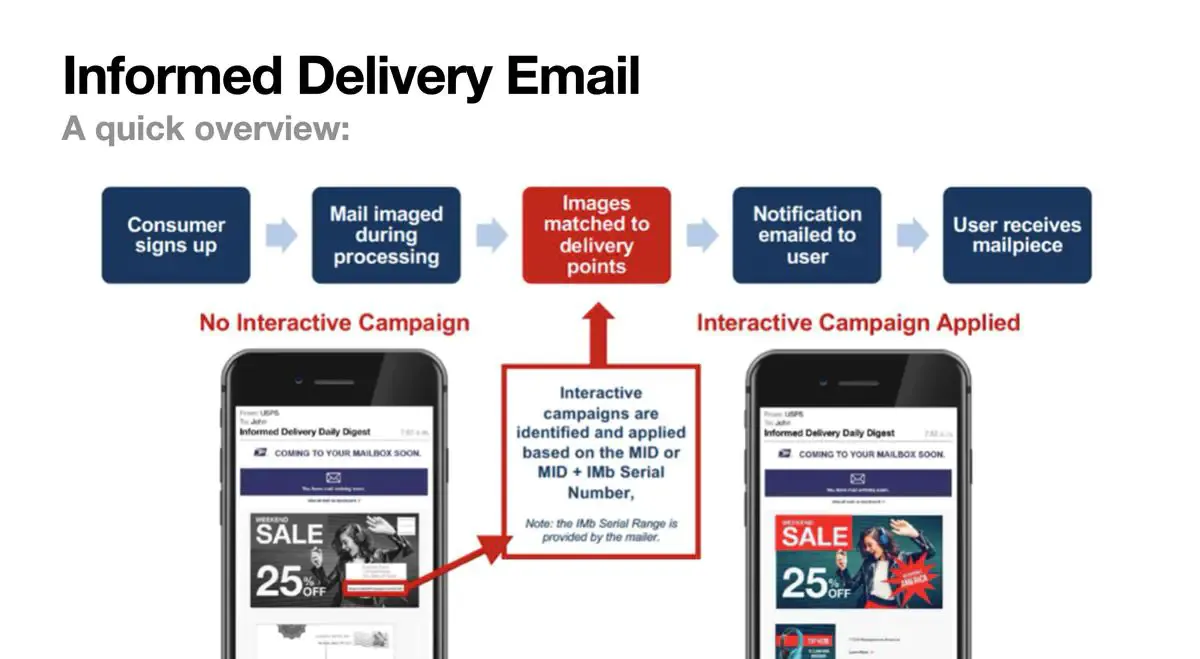
What is Informed Delivery?
Informed Delivery is a free service offered by the USPS that provides users with digital previews of their incoming mail via email before physical delivery. With over 47 million subscribers nationwide and growing rapidly, this service represents a significant marketing opportunity.
When running an Informed Delivery campaign, marketers can enhance the standard grayscale mail preview by:
- Replacing it with a full-color digital image (known as a "Representative Image")
- Adding a clickable button or link (called a "Ride-along Image") that directs recipients to a specified target URL
Personalized Informed Delivery Campaigns
While standard Informed Delivery campaigns typically direct all recipients to the same generic landing page or website, MindFire's technology takes this a step further. By integrating MindFire with your campaign, you can create truly personalized experiences where each recipient is directed to their own unique landing page tailored specifically to them.
Target URL Format
For personalized Informed Delivery integration with MindFire, the Target URL must follow this specific format:
https://[DOMAIN_NAME]/informed.html?usps_mid=XXX&usps_sn=YYYWhere:
DOMAIN_NAMEis your microsite domainXXXis the USPS Mailer IDYYYis the USPS Serial Number
Advantages for Direct Mailers
Personalized Informed Delivery campaigns offer several compelling advantages:
- Increased engagement: Personalized content drives significantly higher click-through rates compared to generic content
- Enhanced tracking: Gain deeper insights into which specific recipients are engaging with your mail and how they interact with it
- Seamless experience: Create consistent, cohesive messaging across both digital and physical touchpoints in the customer journey
- Improved conversion: Personalized landing pages consistently outperform generic ones in terms of conversion rates
- Extended campaign reach: Connect with recipients digitally before the physical mail even arrives in their mailbox, creating multiple touchpoints
Integrating MindFire with Informed Delivery
Creating personalized experiences for your USPS Informed Delivery campaigns is straightforward with the MindFire JavaScript SDK. The following step-by-step guide will walk you through the entire implementation process.
Prerequisites
Before starting the integration, ensure you have:
Required data fields in your import file:
- usps_mid: Your USPS Mailer ID for the campaign
- usps_sn: Your USPS Serial Number for the campaign
Properly structured Target URL for your interactive Informed Delivery campaign:
https://[DOMAIN_NAME]/informed.html?usps_mid=XXX&usps_sn=YYYWhere DOMAIN_NAME is your microsite domain, XXX is your USPS Mailer ID, and YYY is your USPS Serial Number.
Step 1: Create a New Index in Data Services
To enable fast and efficient lookups, you'll need to create a composite index for the usps_mid and usps_sn fields. This index will significantly improve query performance when using these fields as filters in the JS SDK.
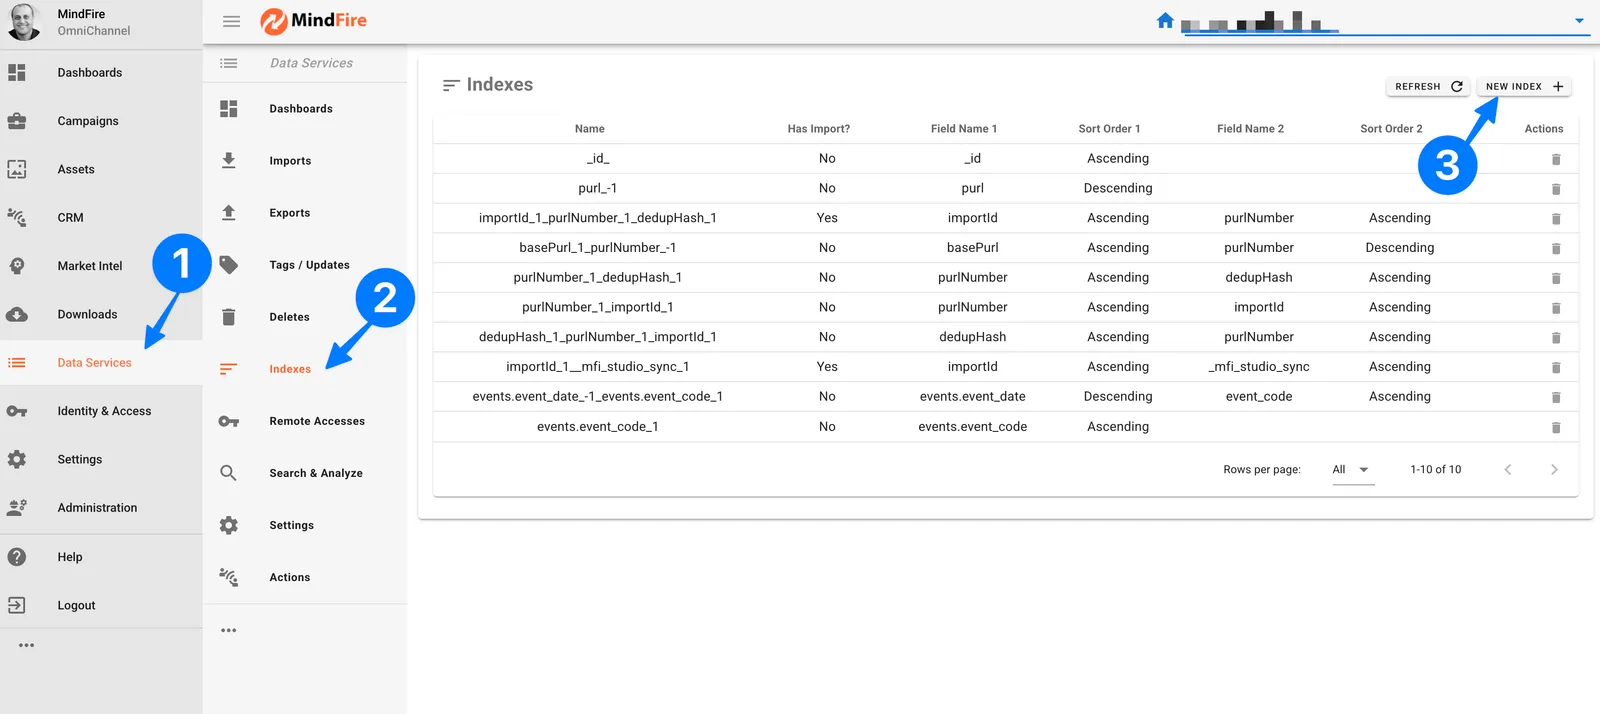
- Navigate to Data Services > Indexes in your MindFire dashboard
- Click on the New Index + button in the top right corner
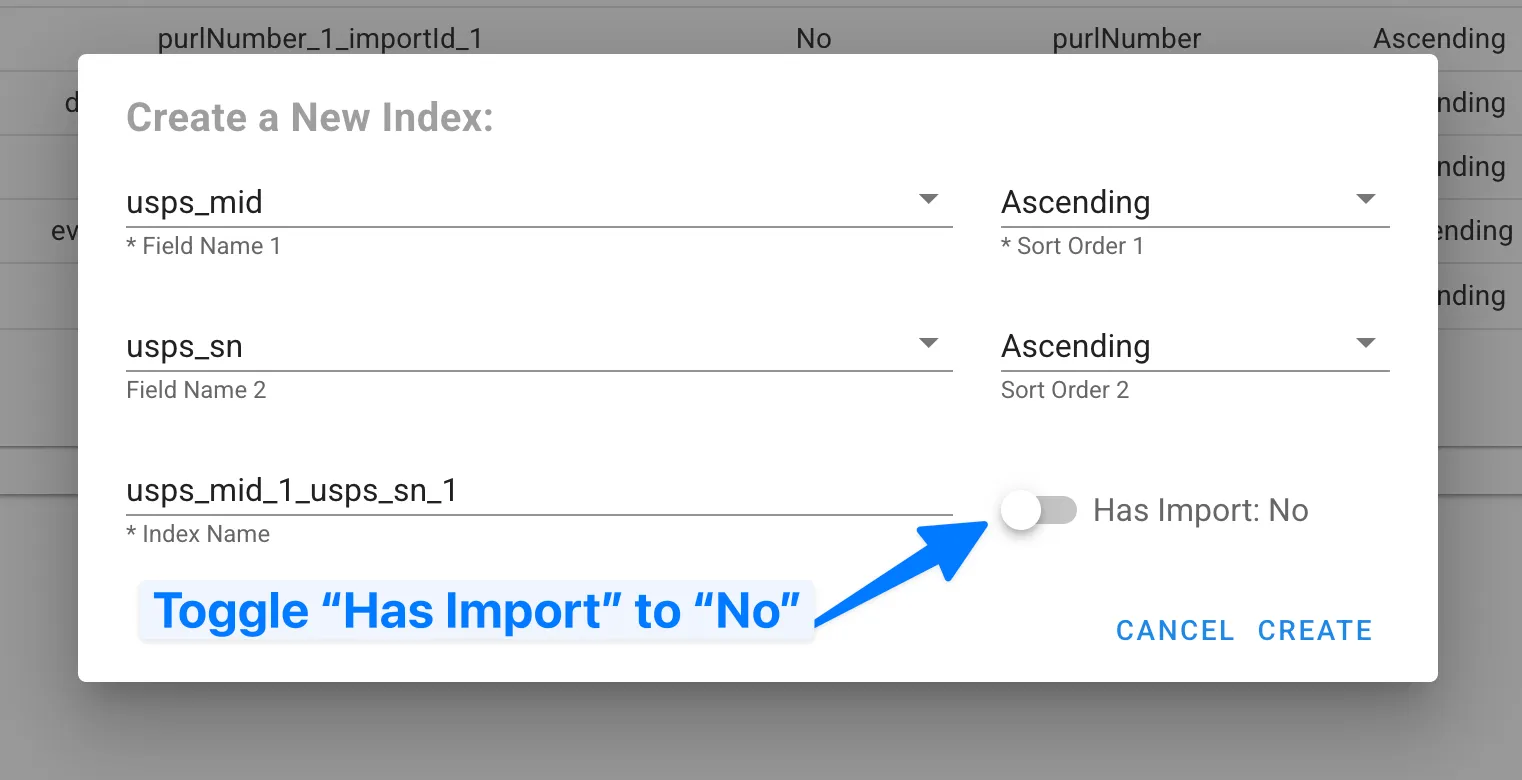
- In the dialog that appears:
- Toggle Has Import to No
- Add
usps_midas the first index field with Ascending order - Add
usps_snas the second index field with Ascending order - Click Create to build the index
Step 2: Configure Remote Access
Security is a core principle of the MindFire platform. To safely allow access from a third-party domain, you must explicitly whitelist that domain through the Remote Access configuration:

- Navigate to Data Services > Remote Access in your MindFire dashboard
- Click on the New Access + button in the top right corner
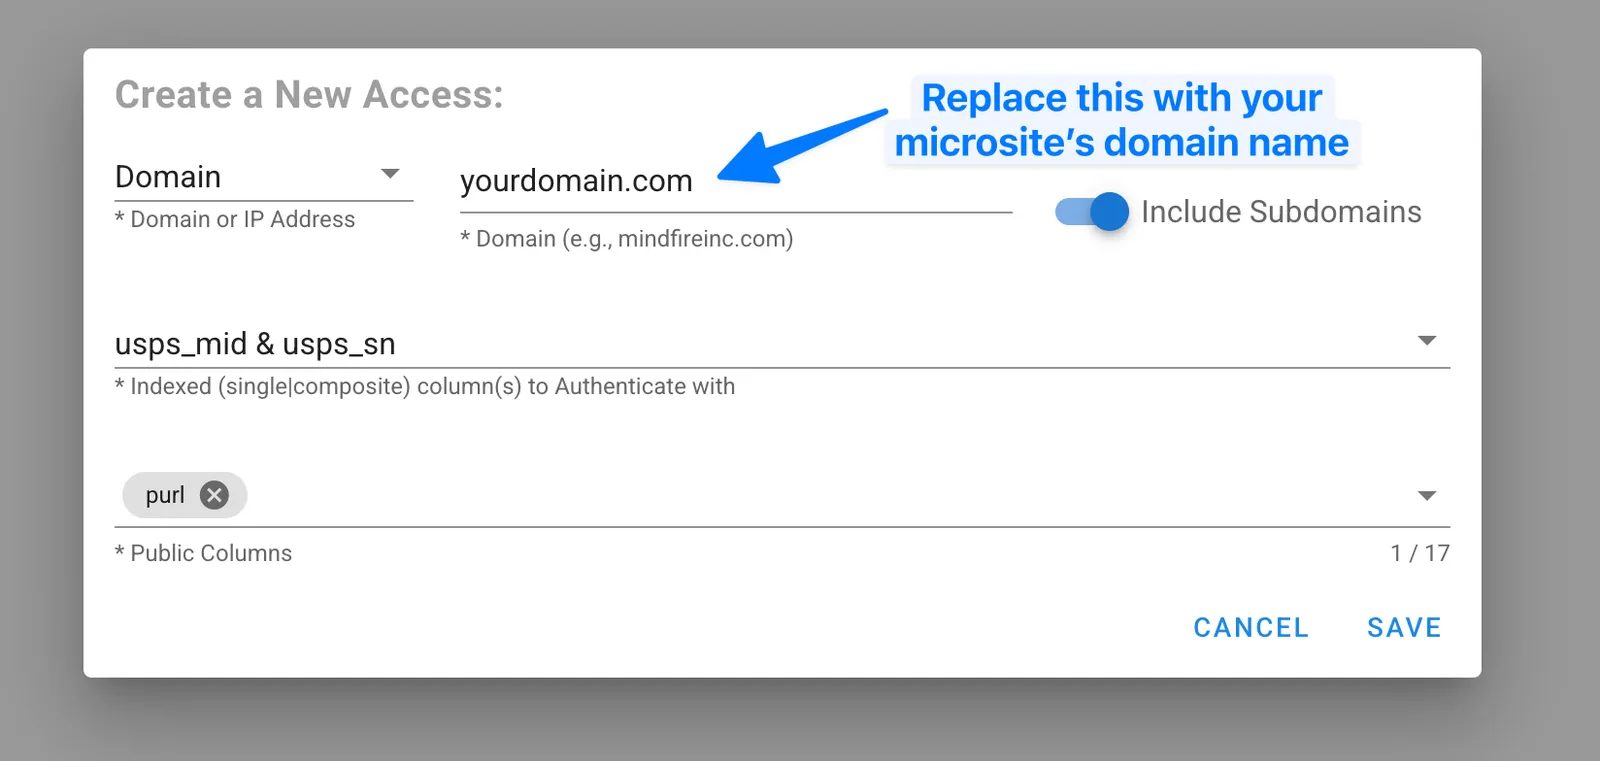
- Complete the configuration form:
- Select Domain from the access type dropdown
- Enter your microsite's domain name in the domain field
- Toggle the Include Subdomains switch to ON (this allows access from all subdomains)
- From the Filter dropdown, select the
usps_mid&usps_sncomposite index you created in Step 1 - Select PURL as the public column that will be accessible
- Click Save to apply the configuration
Step 3: Create Your Microsite Workflow
Now you'll need to set up the necessary pages in your MindFire program's Microsite to handle the redirection flow:

Your microsite requires two key pages:
informed.html (required name)
- This page must use this exact filename to match the Target URL in your Informed Delivery campaign
- This is the initial landing page when someone clicks a link in their Informed Delivery email
- Visitors won't see this page as they'll be automatically redirected
- The page contains the JavaScript code that retrieves the visitor's PURL from MindFire's database based on the usps_mid and usps_sn parameters
id.html (customizable name)
- This is the destination page where visitors are redirected after their PURL is retrieved
- You can rename this page to anything you prefer (e.g., "welcome.html", "offer.html"). Just ensure you use the same name in the JavaScript code in Step 4
- This page should contain your personalized content and offers
Step 4: Implement the Redirection Code
Copy and paste the following HTML code into your informed.html page. This code handles the retrieval of the visitor's PURL based on the USPS parameters and redirects them to your personalized page.
WARNING
Before saving, you must replace the following placeholders in the code:
##mf_account_id##- Replace with your Program's MindFire Account ID (e.g.,3670)##microsite_url##- Replace with the complete URL of your Microsite (e.g.,https://yourdomain.com)##id_html_page##- Replace with the filename you chose for your destination page (e.g.,id.htmlorwelcome.html)
<!DOCTYPE html>
<html lang="en">

<head>
    <meta charset="UTF-8">
    <meta name="viewport" content="width=device-width, initial-scale=1.0">
    <title>Redirecting</title>
    <script src="https://mf-cdn.web.app/pixel-v020.js"></script>
    <script>
        (async () => {
            const MF_ACCOUNT_ID = "##mf_account_id##"; // The ID of the MindFire Account. e.g. "670"
            const GURL = "##microsite_url##"; // The URL of the microsite in the MindFire Account. e.g. "https://www.example.com"
            const ID_HTML_PAGE = "##id_html_page##"; // The page that will be used to redirect the user to the microsite. e.g. "id.html"

            const params = new Proxy(new URLSearchParams(window.location.search), {
                get: (searchParams, prop) => searchParams.get(prop),
            });

            let mid = params.usps_mid;
            let sn = params.usps_sn;

            const redirectToGurl = () => {
                window.location.href = GURL;
            };

            const redirectToPurl = (purl) => {
                window.location.href = `${GURL}/${purl}/${ID_HTML_PAGE}`;
            };

            if (!mid || !sn) {
                redirectToGurl();
            }

            const usps_mid = (+mid === +mid && !mid.startsWith("0")) ? +mid : mid; // Convert string value of mid to a number, only if it's a number and does NOT start with "0".
            const usps_sn = (+sn === +sn && !sn.startsWith("0")) ? +sn : sn; // Same for sn.

            const filter = { usps_mid: usps_mid, usps_sn: usps_sn };
            const expiry = 10;
            const shardKey = "";

            async function redirect() {
                try {
                    const record = await _MFS.getRecord(MF_ACCOUNT_ID, filter, expiry, shardKey);
                    const purl = record.data.purl || "";
                    purl ? redirectToPurl(purl) : redirectToGurl();
                } catch (e) {
                    console.log(e);
                    redirectToGurl();
                }
            }

            // Redirect if usps_mid and usps_sn exist, otherwise redirect to gurl.
            (usps_mid && usps_sn) ? redirect() : redirectToGurl();

        })();
    </script>

</head>

<body>
</body>

</html>
Testing and Going Live
Congratulations! Your PURL + Informed Delivery integration is now complete. Before launching your campaign, follow these best practices:
Test thoroughly:
- Test with different combinations of valid USPS MIDs and SNs
- Verify redirect functionality works correctly
- Test on multiple devices and browsers
- Confirm that PURL pages display correctly
Verify tracking:
- Check that events are being properly recorded in MindFire
- Test analytics to ensure you're capturing all interactions
Final checklist:
- Confirm your USPS Informed Delivery campaign is properly configured
- Verify the Target URL format is correctly set up in USPS dashboard
- Double-check all placeholder values have been replaced with actual values
By combining the power of USPS Informed Delivery with MindFire's personalization capabilities, you've created a sophisticated omnichannel marketing experience that will significantly boost engagement and conversion rates for your direct mail campaigns.