Conversational AI: Voice Chat Component
Voice AI Agents are conversational assistants embedded in MindFire’s Personalized Landing Pages using a “voice chat component”. These landing pages are used in marketing campaigns, so the agent becomes an always-on guide that can answer questions, handle objections, and help visitors take the next step—all without leaving the page.
Agents work by combining two key inputs: your business Knowledge Base (FAQs, SOPs, product docs, policies, etc.) and the visitor’s personal/contextual information passed into the component (for example: name, email, company, or campaign data). The result is a voice experience that can speak naturally while also tailoring its guidance to the individual visitor.
This creates value on both sides: visitors get faster, more relevant answers and a more human-feeling experience, while marketers get higher-quality engagement that can boost conversion rates, reduce drop-off, and capture intent signals in real time.
Common use cases:
- Campaign concierge: Explain the offer, answer objections, and guide visitors to the right CTA (book a call, request a demo, download, etc.).
- Product fit + qualification: Ask a few questions, recommend the best plan/package, and route qualified visitors to sales.
- Support-to-conversion: Provide instant help (shipping, returns, pricing, setup), then smoothly transition to purchase or scheduling.
This guide explains how to create, edit, and configure Voice AI Agents in MindFire.
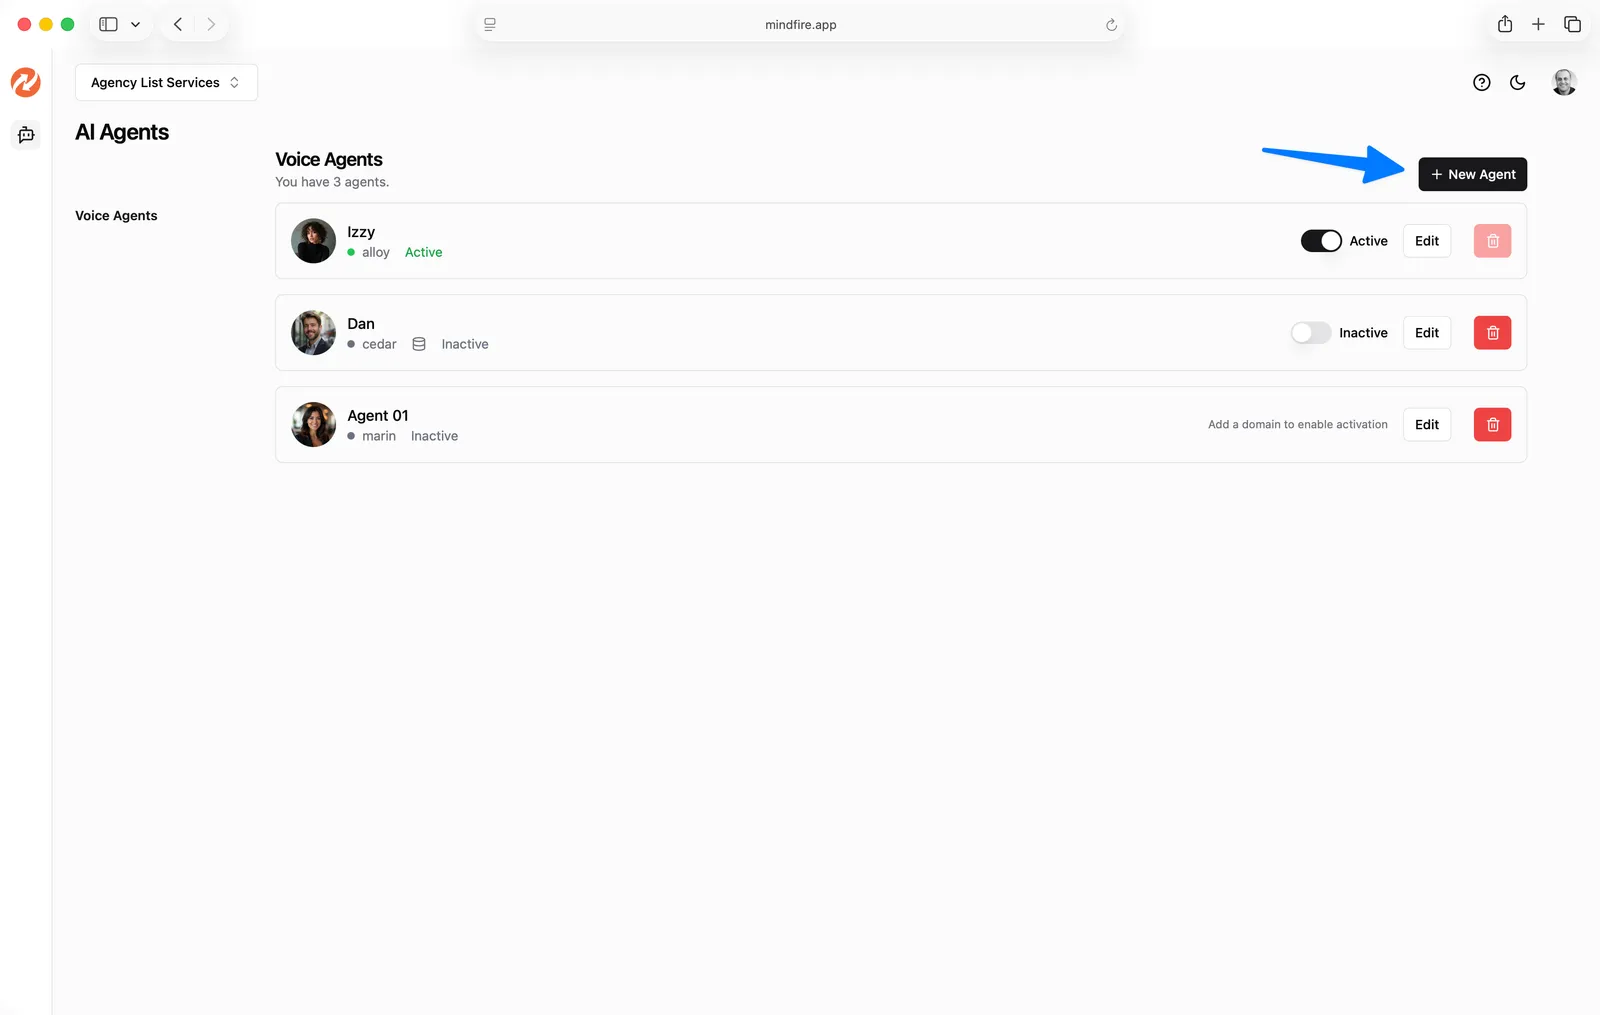
Manage Voice AI Agents
Log in to your MindFire account at https://mindfire.app and navigate to AI Agents → Voice Agents.
- The
Voice Agentspage lists all agents in your account. - Click
Editto open the agent configuration screen. - Click
New Agentto create a new agent.
Create a New Agent
- Go to
AI Agents→Voice Agents. - Click
New Agent. - Enter an
Agent Name. - Click
Create Agent.
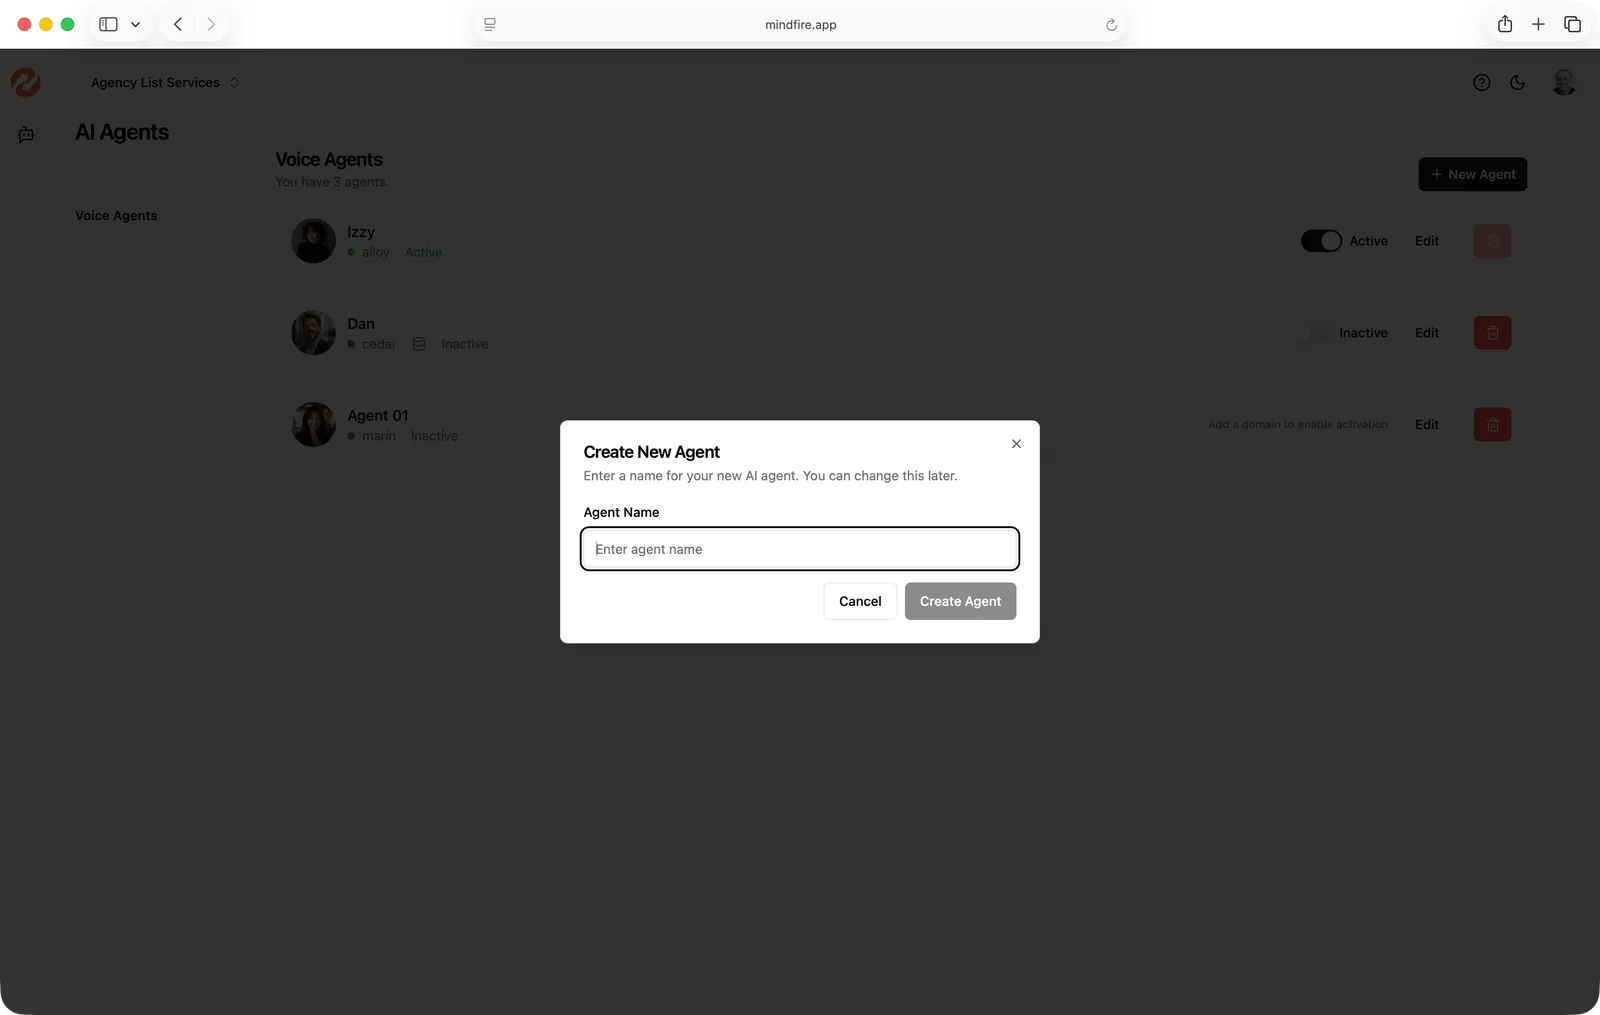
After creation, you’ll be taken to the Edit Agent page to configure the agent.
Configure an Agent
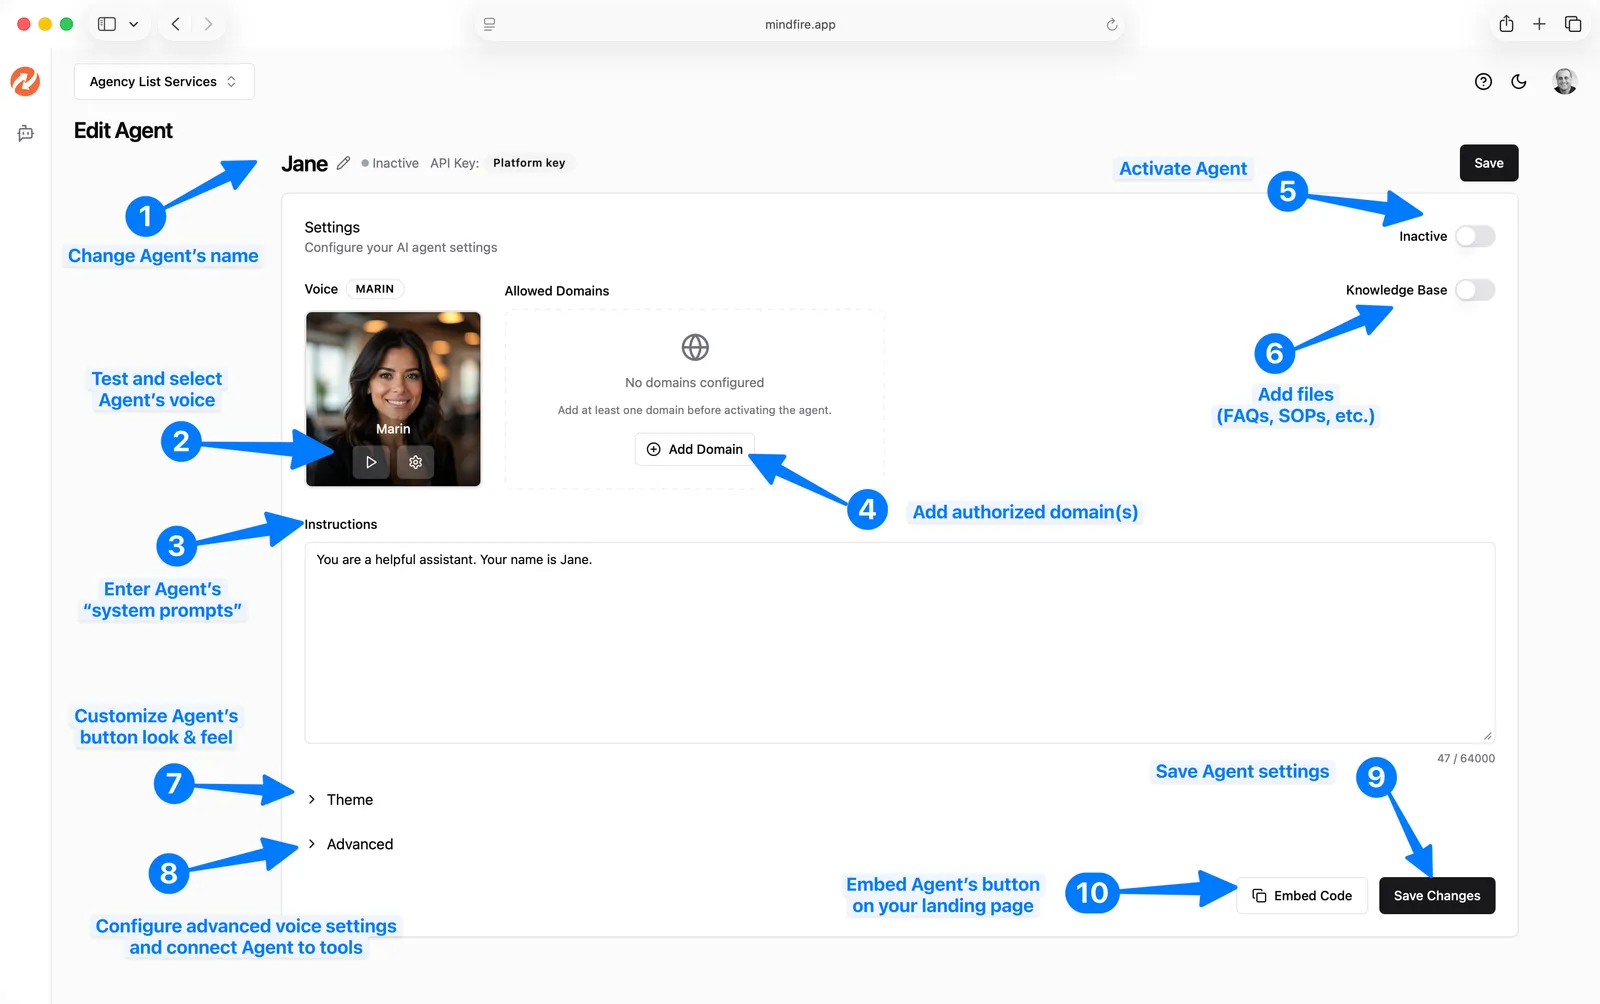
1) Change the agent’s name
- On the
Edit Agentpage, click the agent name at the top and type the new name. - Click the
Savebutton at the top (orSave Changesat the bottom) of the page.
2) Test and change the agent’s voice
- In the
Voicecard, click the play button to preview the current voice. - Click
Change Voiceto open the voice picker.- You can preview multiple voices before selecting one.
- Click
Select Voiceon the voice you want.
- Click
Save.

3) Enter the agent’s “system prompt” (Instructions)
- In
Instructions, enter the guidance that defines how the agent should behave. - The instructions field supports up to 64,000 characters.
- Click
Save.
Recommended content for strong instructions:
- Role/persona (who the agent is and how it should speak)
- Primary goals (what success looks like)
- Guardrails (what the agent should not do)
- Escalation paths (when to hand off to a human or direct to support)
- If using a Knowledge Base: how to reference it and when to answer from it
- If using tools (Zapier MCP): when to use tools and what to confirm before taking actions
TIP
For more information and best practices, see OpenAI's Realtime Prompting Guide.
WARNING
While you can enter up to 64,000 characters, we recommend keeping it concise (lower than 10,000 characters) to improve performance.
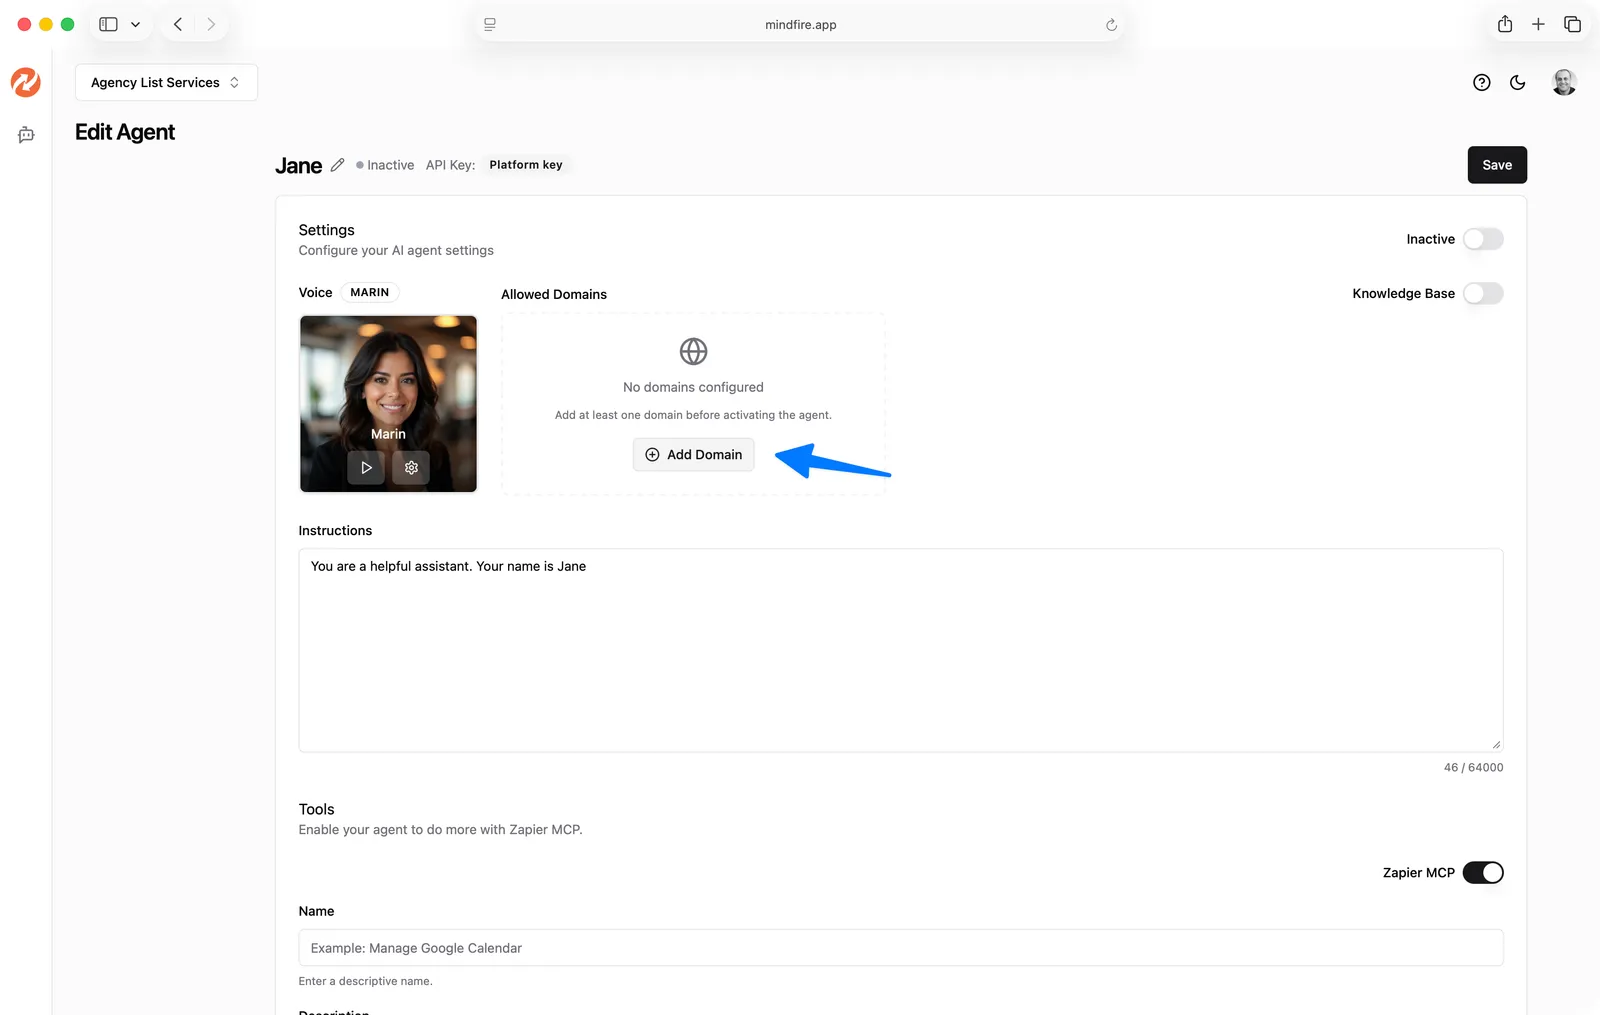
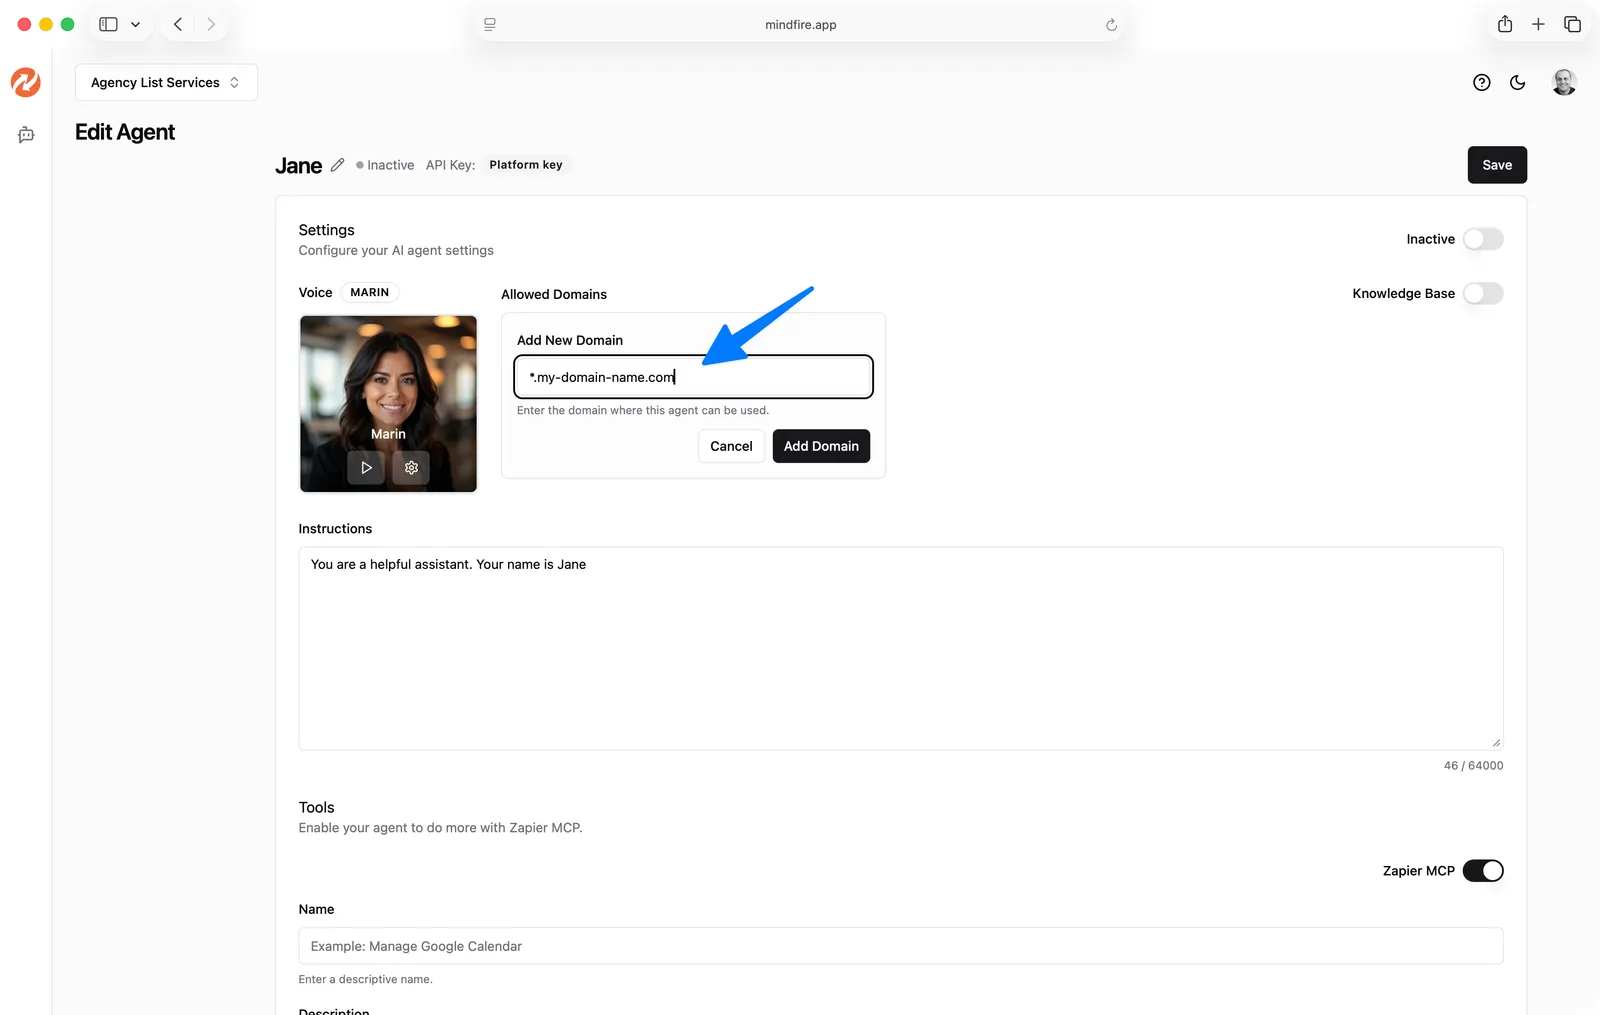
4) Add authorized domain(s) (Allowed Domains)
Allowed domains determine where the agent widget is allowed to load.
- In
Allowed Domains, clickAdd Domain. - Enter the domain host and click
Add Domain(or press Enter). - Repeat for additional domains.
WARNING
Important rules:
- Enter only the host, not a full URL.
- ✅
example.com,www.example.com,*.example.com - ✅
localhost(for local development) - ❌
https://example.com(protocol not allowed) - ❌
example.com/path(paths not allowed) - ❌
example.com:3000(ports not allowed)
- ✅
- If the agent is active, you cannot remove the last allowed domain—deactivate first.
5) Activate the agent
- Use the
Active / Inactivetoggle (top right of the settings card). - The agent can only be activated when:
- At least one allowed domain is configured, and
- Any enabled tools configuration is valid (e.g., Zapier MCP required fields are filled).
- The active toggle saves automatically; click
Saveif you changed other fields.
6) Add files (Knowledge Base)
The Knowledge Base lets the agent answer using your uploaded documents (FAQs, SOPs, policies, etc.).
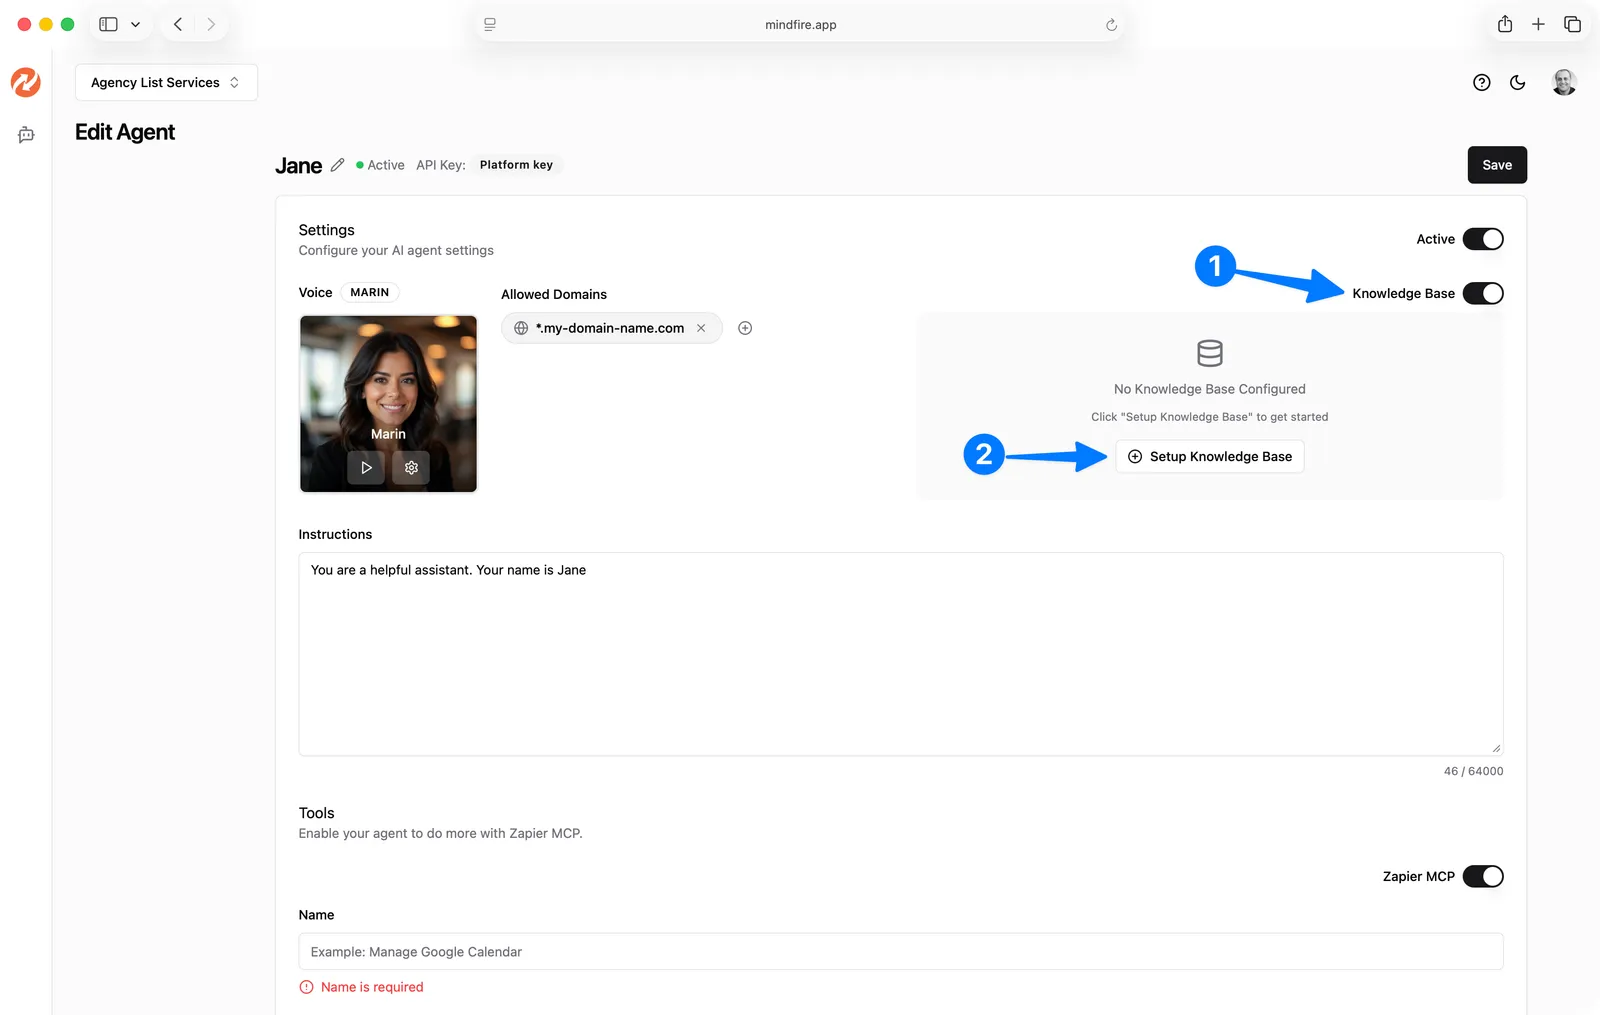
- Toggle
Knowledge Baseon. - Click
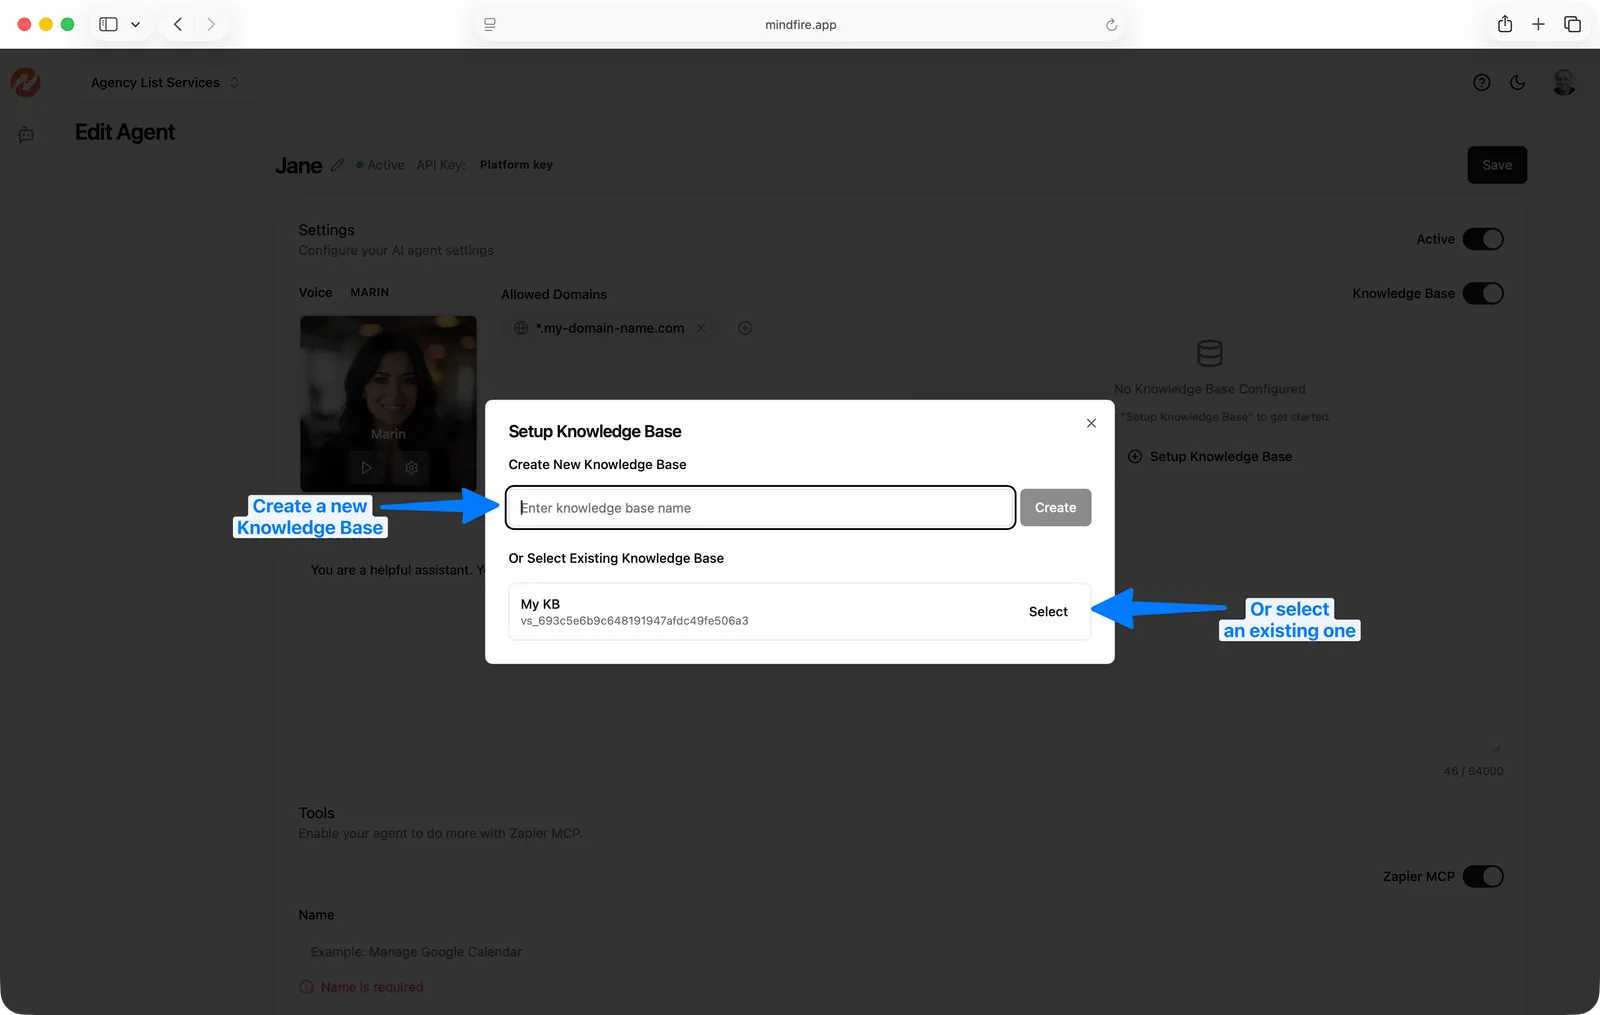
Setup Knowledge Base. - Choose one:
Createa new knowledge base, or- Select an existing one.
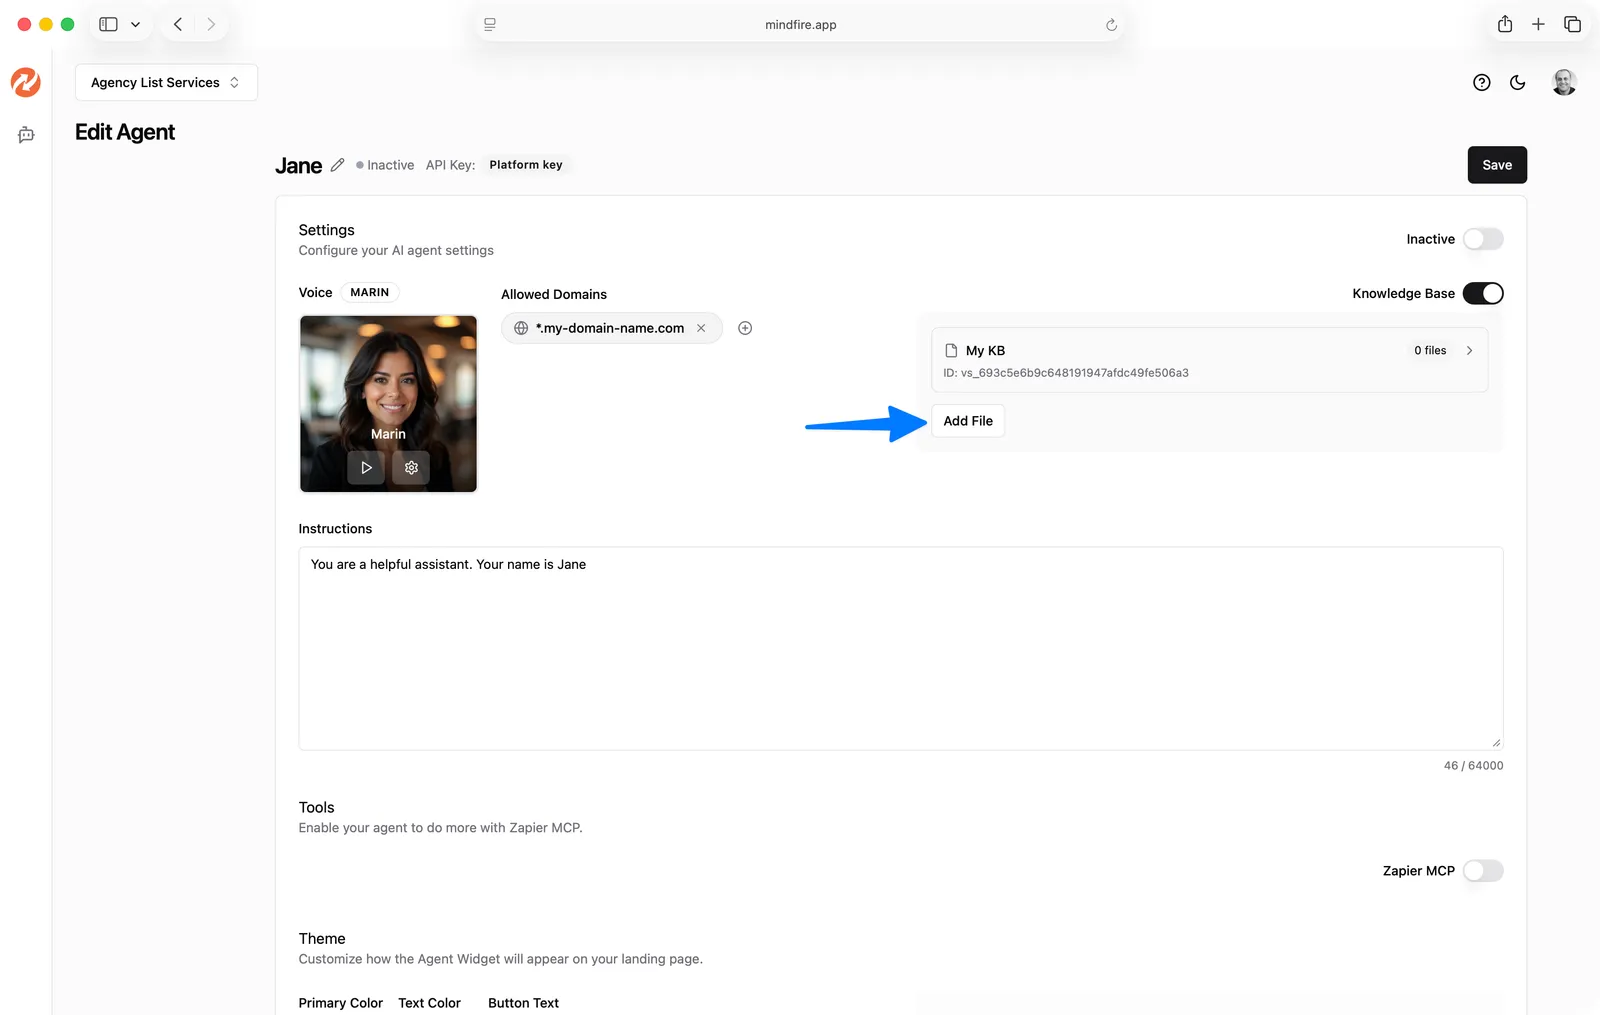
- Click
Add Fileand upload documents. - Click
Saveif you changed other fields.
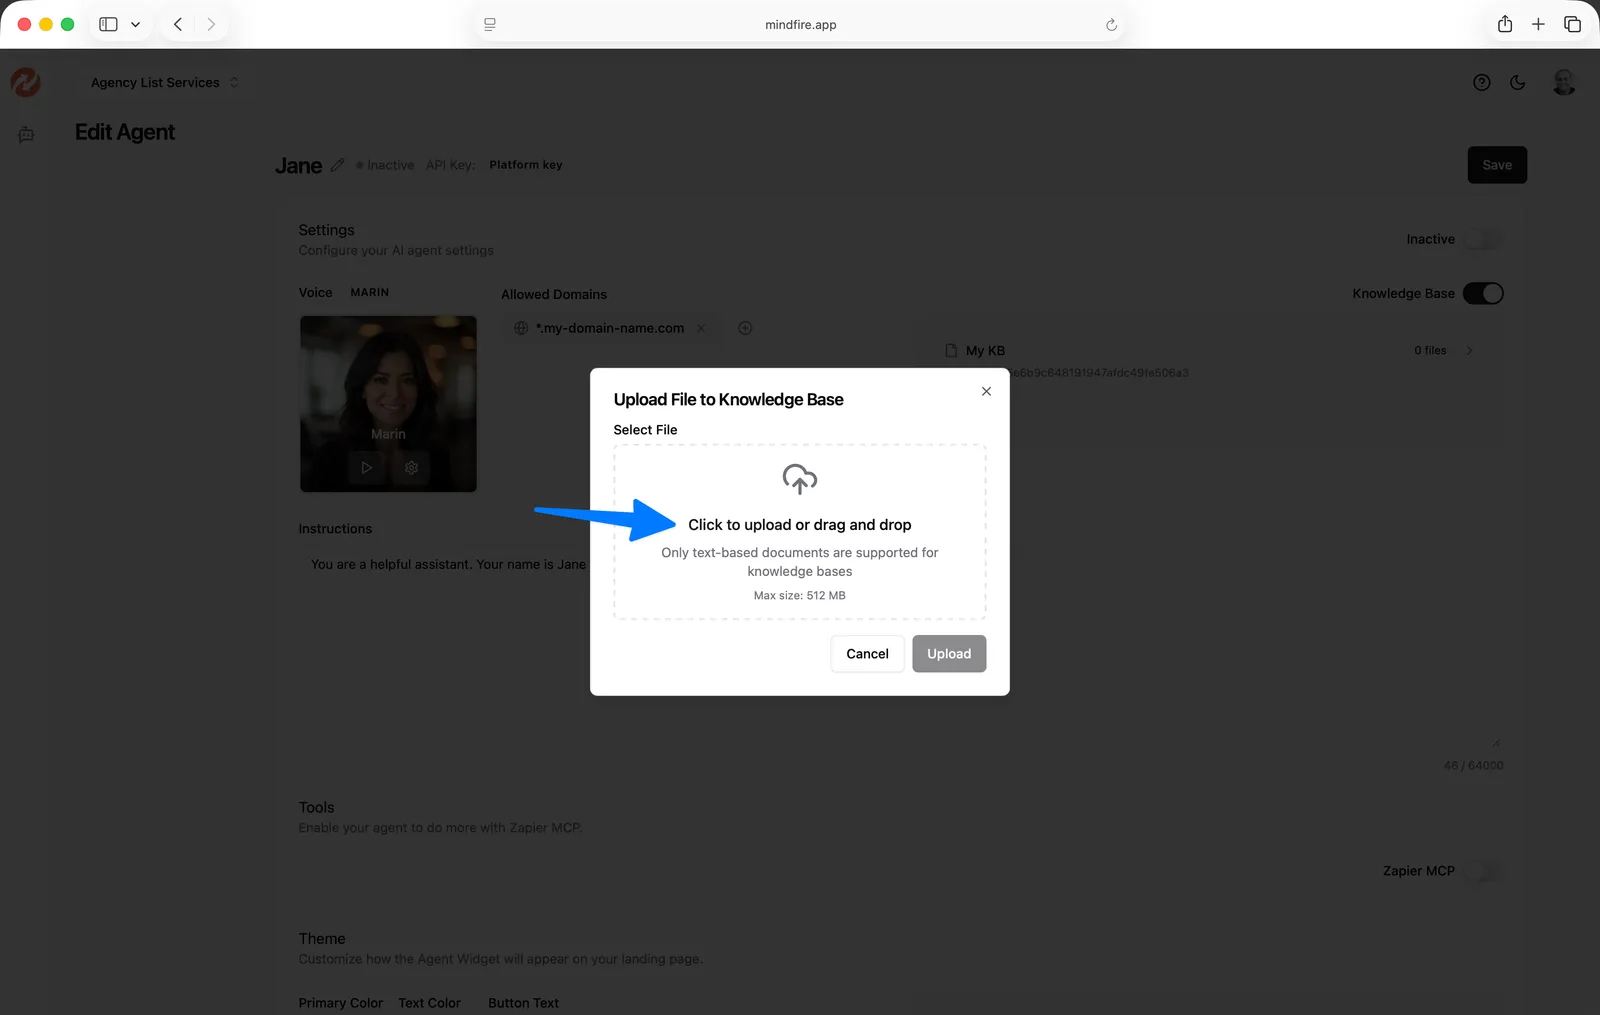
INFO
Supported file types include: .pdf, .docx, .doc, .txt, .md, .rtf, .pptx, .ppt, .html, .xlsx, .xls, .csv
Maximum file size: 32 MB
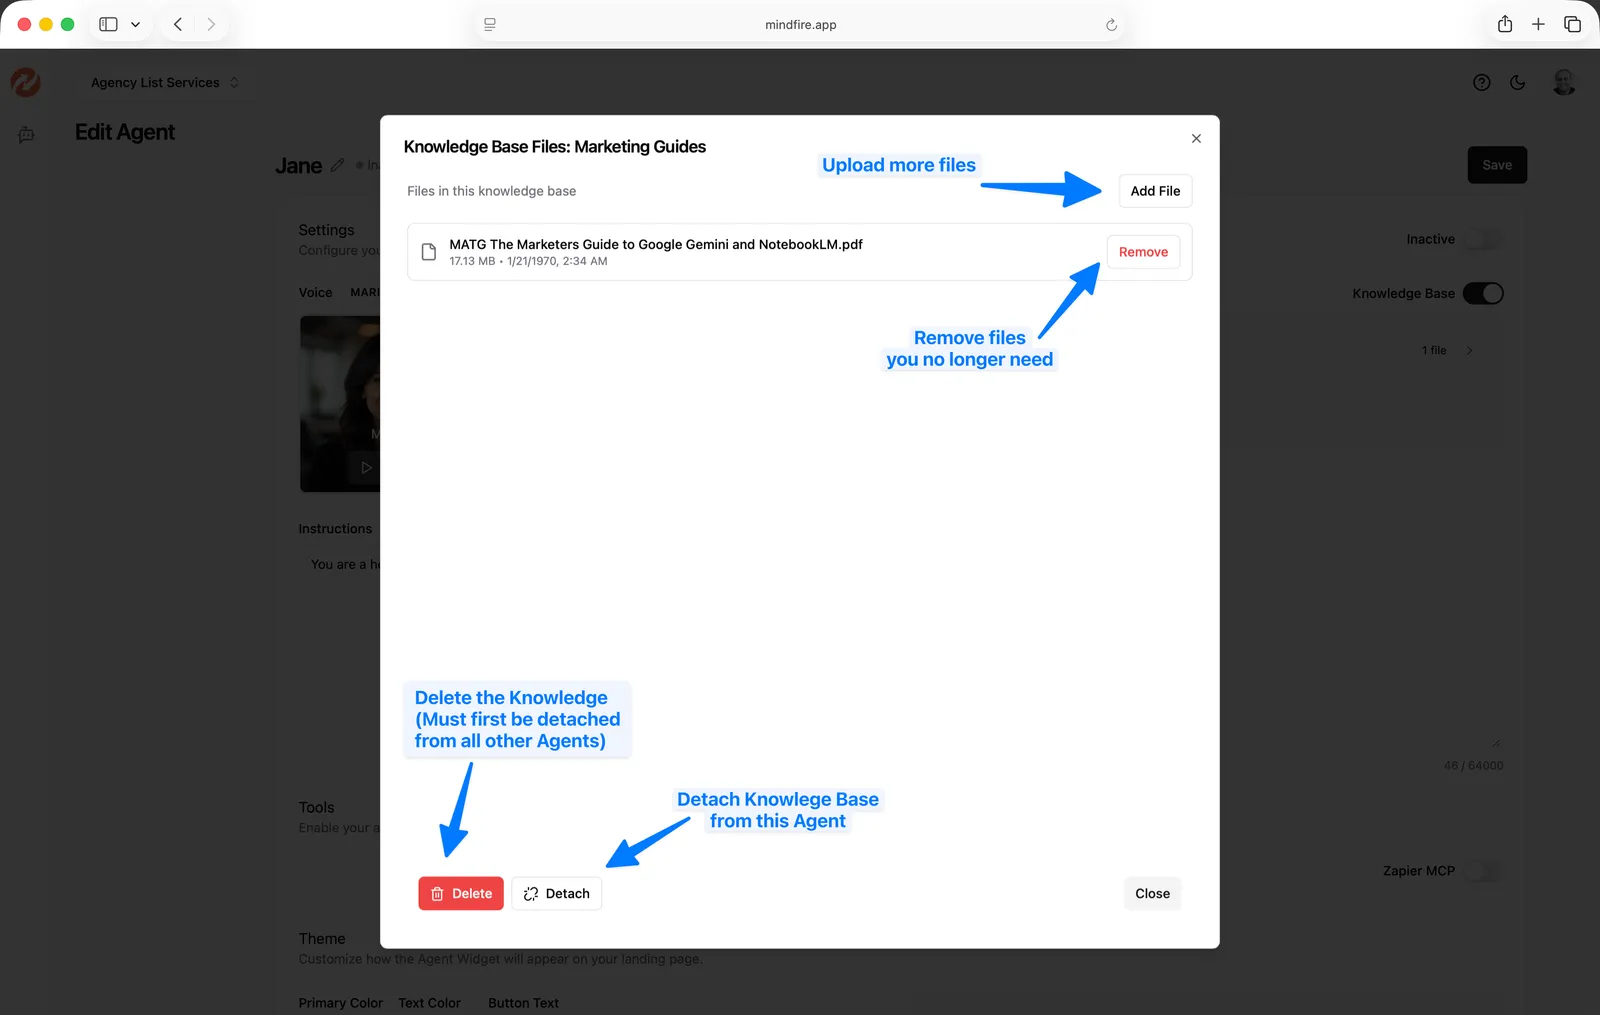
Managing Knowledge Base files:
- Click the knowledge base row to view the file list.
- Remove a file to stop using it in that knowledge base.
Detachremoves the knowledge base from this agent.Delete Knowledge Basepermanently deletes the knowledge base container
INFO
- If a knowledge base is attached to multiple agents, you must detach it from each agent before deleting.
- When deleting a knowledge base, files remain available for other knowledge bases.
7) Connect the agent with apps (Tools / Zapier MCP)
Tools allow the agent to trigger actions in connected systems via Zapier MCP.
- In
Tools, toggleZapier MCPon. - Fill in all required fields:
Name(a descriptive tool name)Description(what it does and when the agent should use it)Zapier API Key(obtained from your Zapier account)Allowed Tools(comma-separated tool identifiers)
- Click
Save.
INFO
To learn how to set up a Zapier MCP and get a Zapier API Key, see Zapier's documentation.
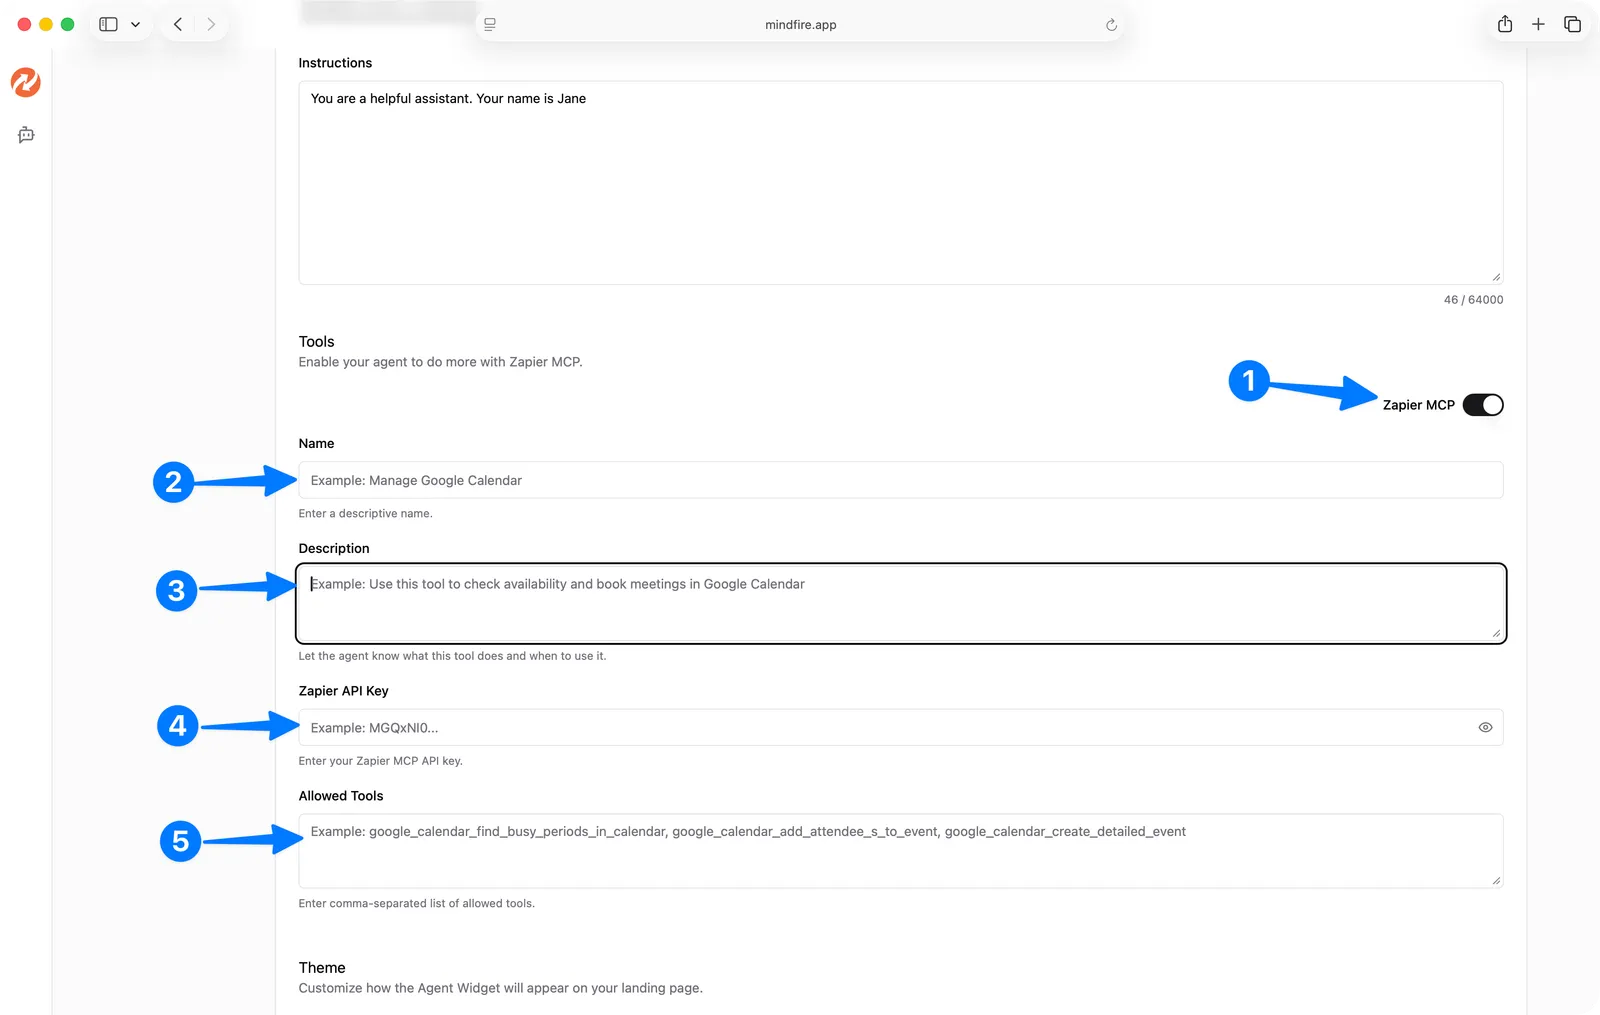
WARNING
If Zapier MCP is enabled but required fields are missing, the agent cannot be saved/activated until the configuration is complete.
8) Change the agent widget look and feel (Theme)
In Theme, customize how the widget appears on your site:
Primary ColorandText ColorButton Text(supports{agentName}placeholder)Avatar URL(optional; leave blank to use the selected voice image)Show/Hideavatar toggleButton Size— controls the padding, font size, and height of the start button (small,medium,large; default:medium)Button Style— controls the background treatment (filled,outline,soft; default:filled)Show Button Shadow— toggle the drop shadow on the filled-style button (default: on)
Use the preview button to confirm styling, then click Save.
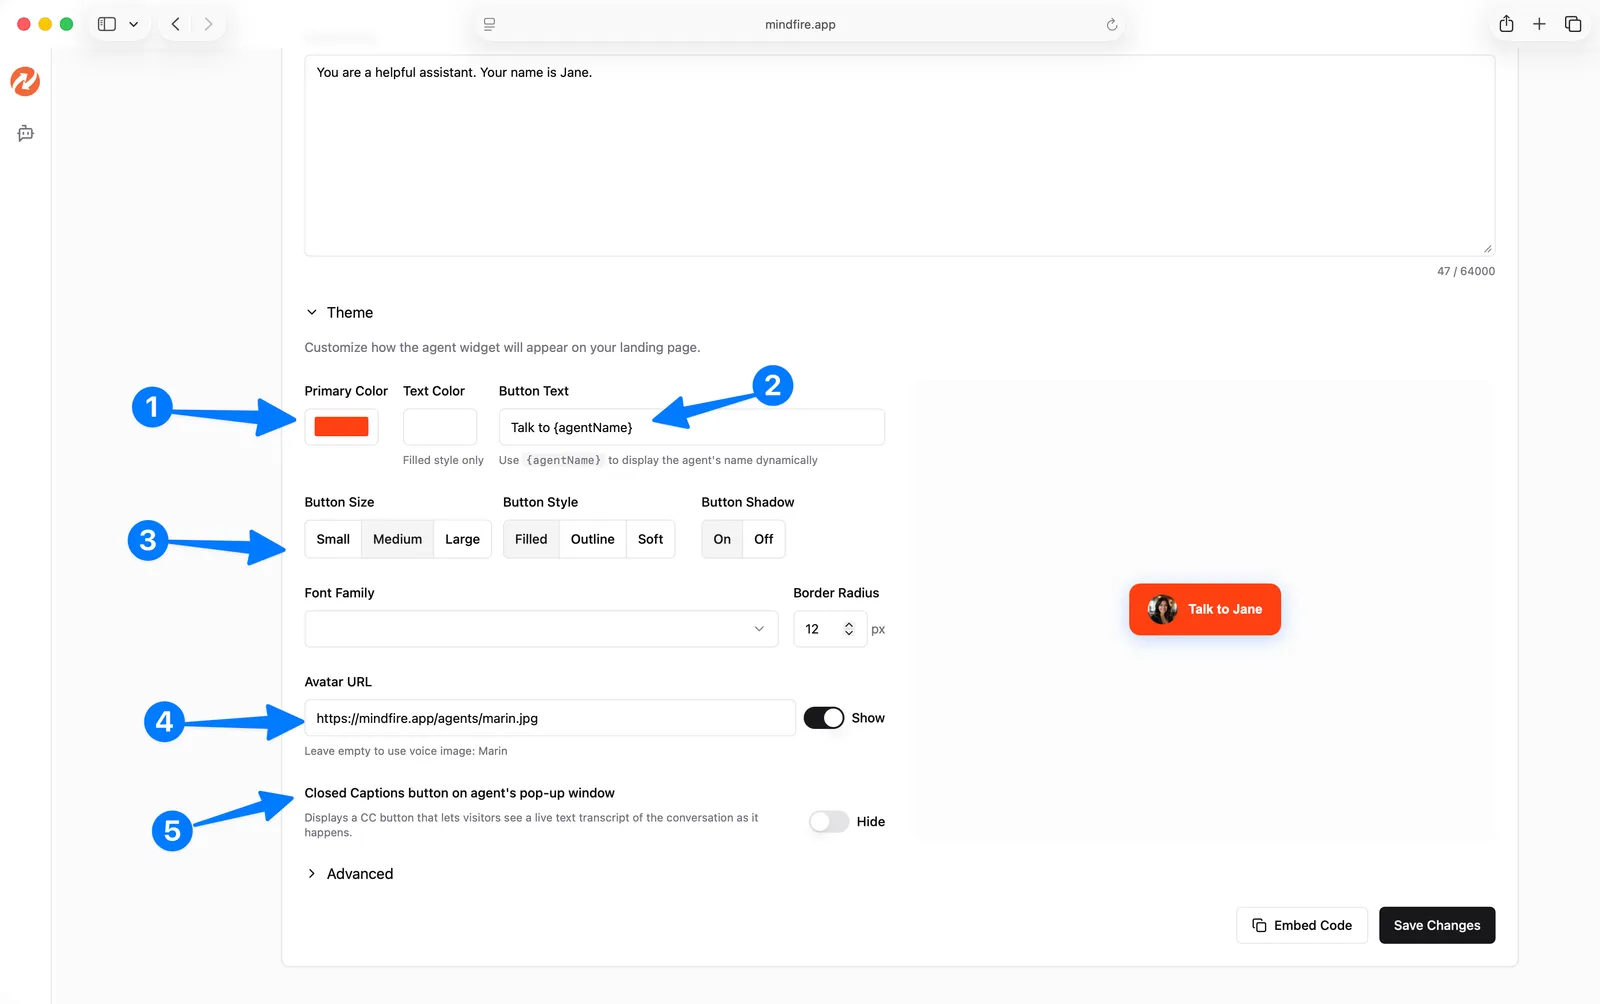
TIP
To use the default image of the voice, leave the Avatar URL field blank and save.
9) Enable closed captions (CC)
When enabled, a [CC] toggle button appears in the modal controls. Visitors can click it to show a caption bar at the bottom of the screen that displays real-time transcriptions of the conversation.
- In
Theme, enableShow CC Button. - Click
Save.
Here's how the Closed Caption button and transcript will appear on the landing page:
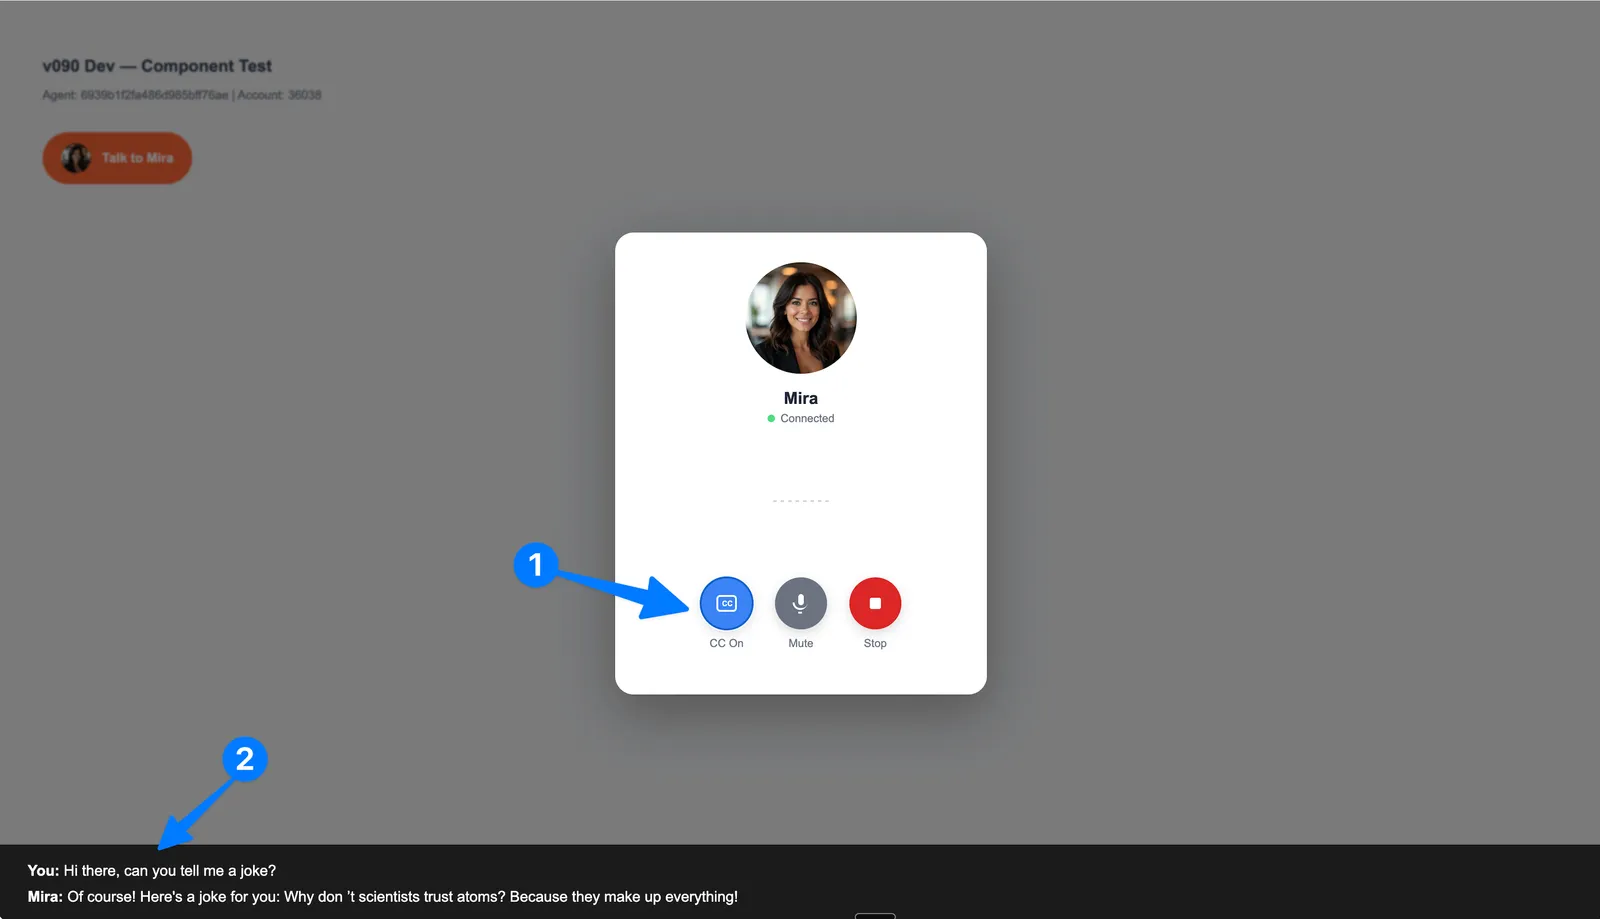
How captions work:
- The caption bar appears at the bottom of the browser viewport (not inside the modal).
- Your visitor’s speech appears immediately after they finish speaking.
- The agent’s captions appear in real time as the agent speaks.
- The caption bar is automatically removed when the conversation ends.
INFO
The CC button is hidden by default. Enable it only if accessibility or transcript visibility is important for your use case.
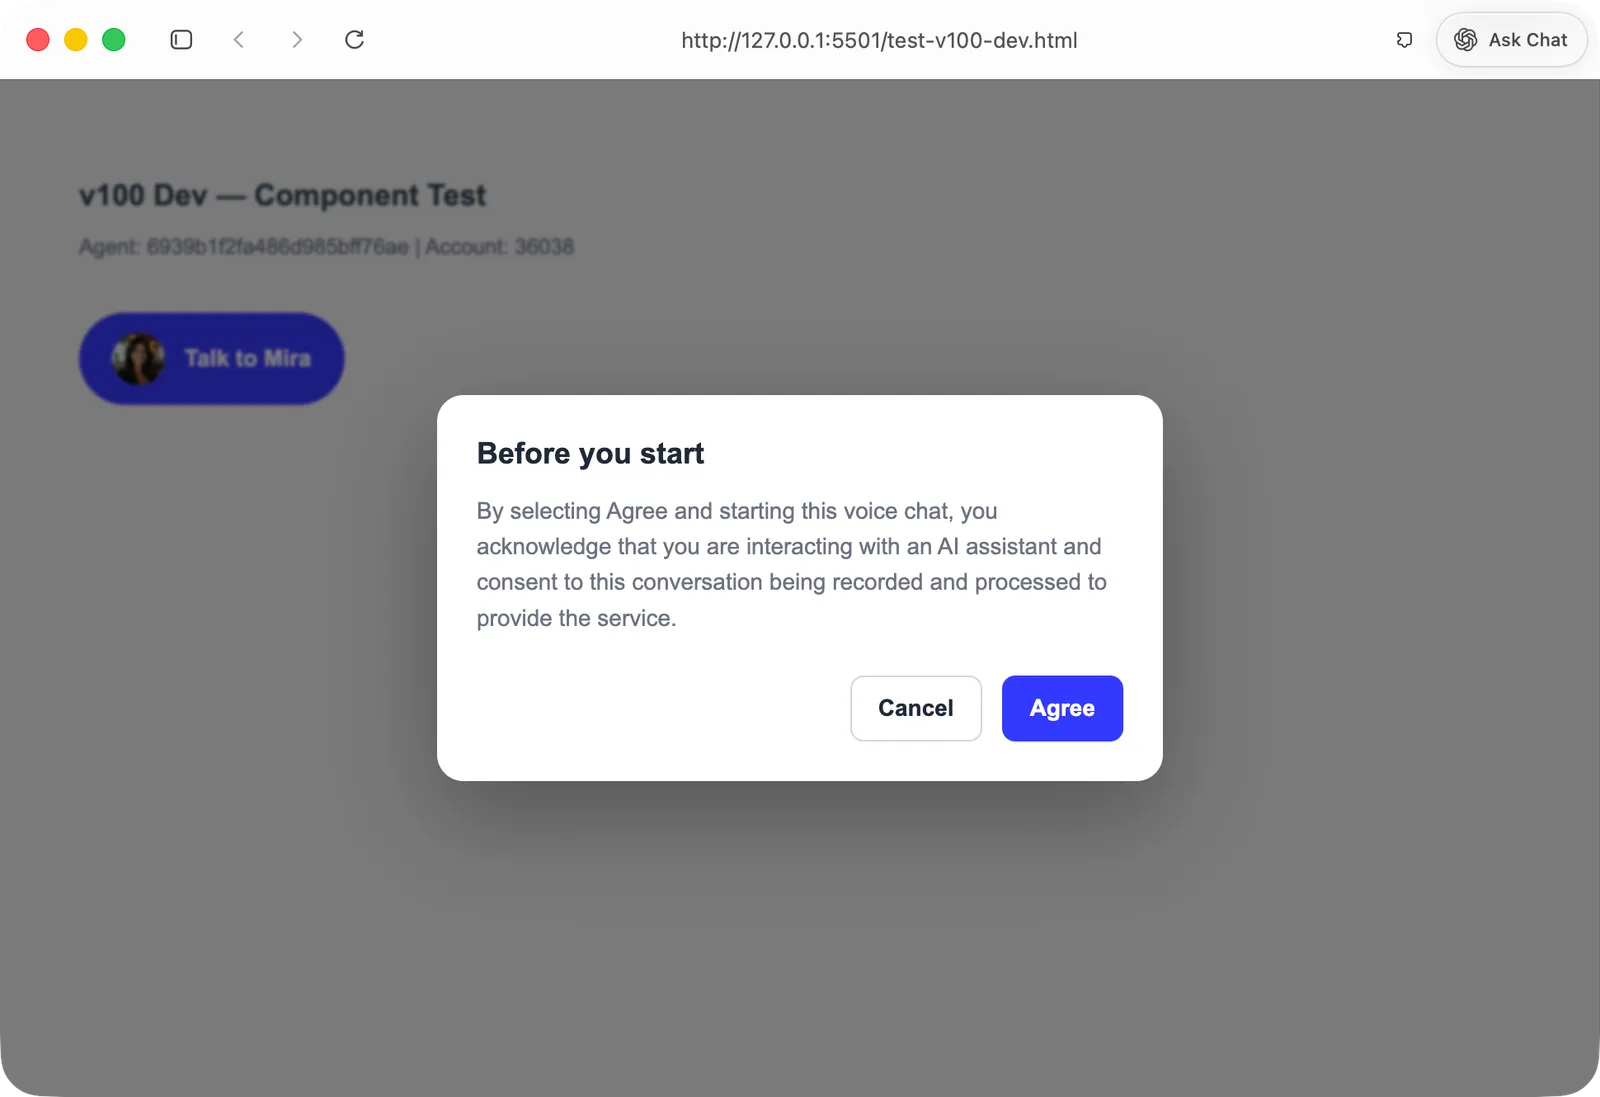
10) Configure consent before voice chat starts
Consent controls let you show a required prompt before the visitor starts a voice conversation. When enabled, the visitor must click Agree before the widget requests microphone permission or connects to the voice session.
- Open the
Advancedsection. - In
Compliance, enableConsent popup. - Review or edit the consent message.
- Click
Save.
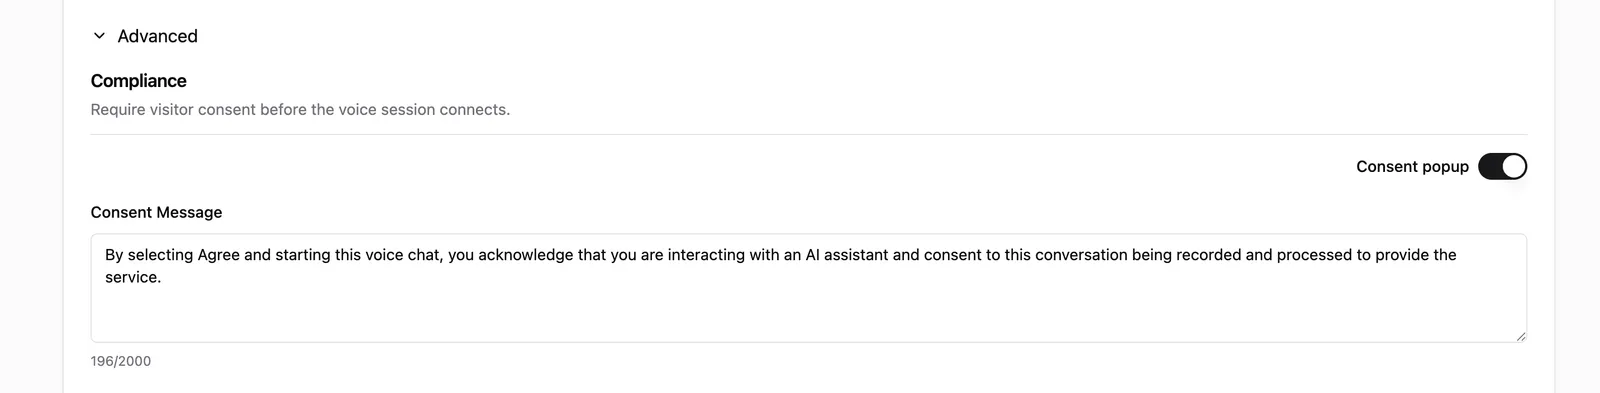
Default consent message:
By selecting Agree and starting this voice chat, you acknowledge that you are interacting with an AI assistant and consent to this conversation being recorded and processed to provide the service.How consent works:
- The consent prompt appears before microphone permission is requested.
- Consent is requested every time the visitor starts a new voice session.
- The Voice Chat SDK does not remember consent in browser storage.
- The MindFire admin/backend does not persist visitor consent records.
- When the visitor clicks
Agree, the component emits avoice.consent.acceptedevent that can be captured by your event persistence setup. - When the visitor clicks
Cancelor dismisses the prompt with Escape, the component emits avoice.consent.declinedevent.
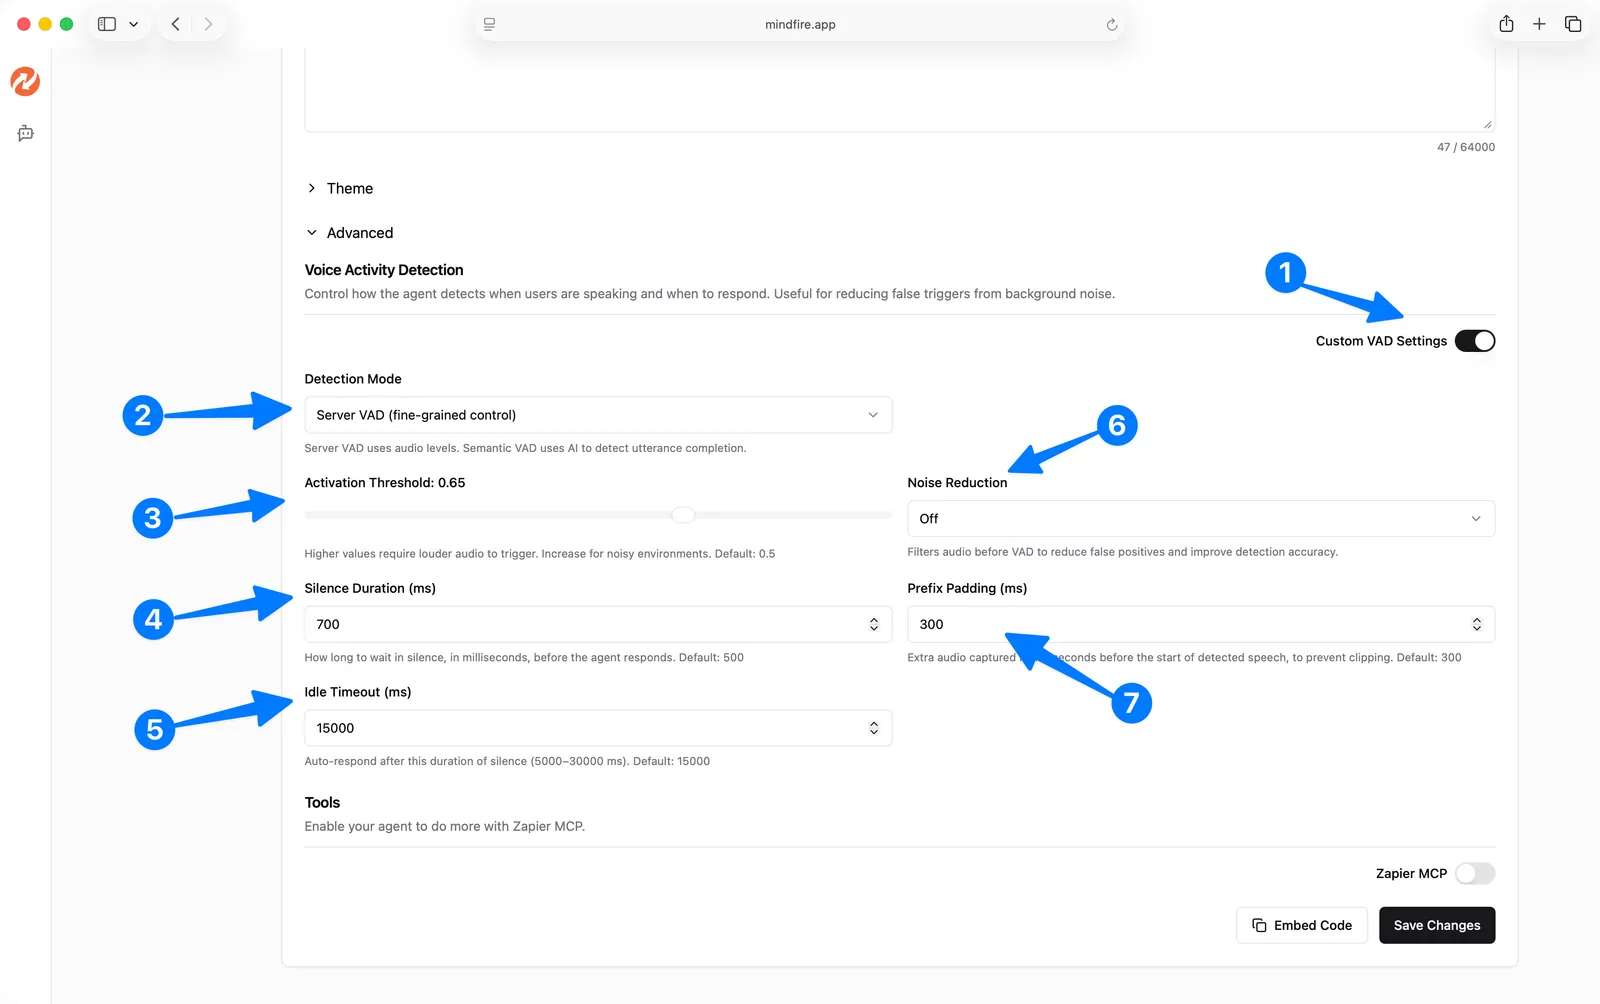
11) Configure voice activity detection (VAD)
Voice Activity Detection (VAD) controls how the agent detects when your visitor starts and stops speaking. Two modes are available:
| Mode | Best For |
|---|---|
server_vad | Standard voice detection based on audio signal levels |
semantic_vad | AI-powered turn detection based on the meaning of speech — better for natural, conversational exchanges |
server_vad parameters:
| Parameter | Description |
|---|---|
Threshold | Sensitivity to audio — higher values require louder speech to trigger |
Silence Duration | How long (ms) the user must be silent before the turn ends |
Prefix Padding | Audio (ms) captured before voice activity is detected |
Idle Timeout | Session ends after this many milliseconds of inactivity (5,000–30,000 ms) |
semantic_vad parameters:
| Parameter | Description |
|---|---|
Eagerness | How quickly the agent jumps in: low, medium, high, or auto |
INFO
If no VAD configuration is set, the component falls back to server_vad with a 15-second idle timeout.
WARNING
Idle Timeout is only supported in server_vad mode. Semantic VAD uses eagerness-based timing.
12) Configure noise reduction
Optional noise reduction filters the visitor’s microphone audio before voice activity detection runs, reducing false triggers from background noise.
In Noise Reduction, choose a mode:
| Mode | Use When |
|---|---|
near_field | Visitor is using headphones or a close microphone |
far_field | Visitor is using laptop speakers or a speakerphone |
Leave this off (default) if your visitors are typically in quiet environments.
Embed the Agent Widget on Your Website
From the Edit Agent page:
- Click
Embed Code. - Follow the modal’s steps to:
- Add the
<voice-chat-component ...>element where you want the widget to appear - Add the
<script ...>tag before</body> - Optionally set
datafor contextual personalization - Optionally set
historyto pass in prior conversation transcripts
- Add the
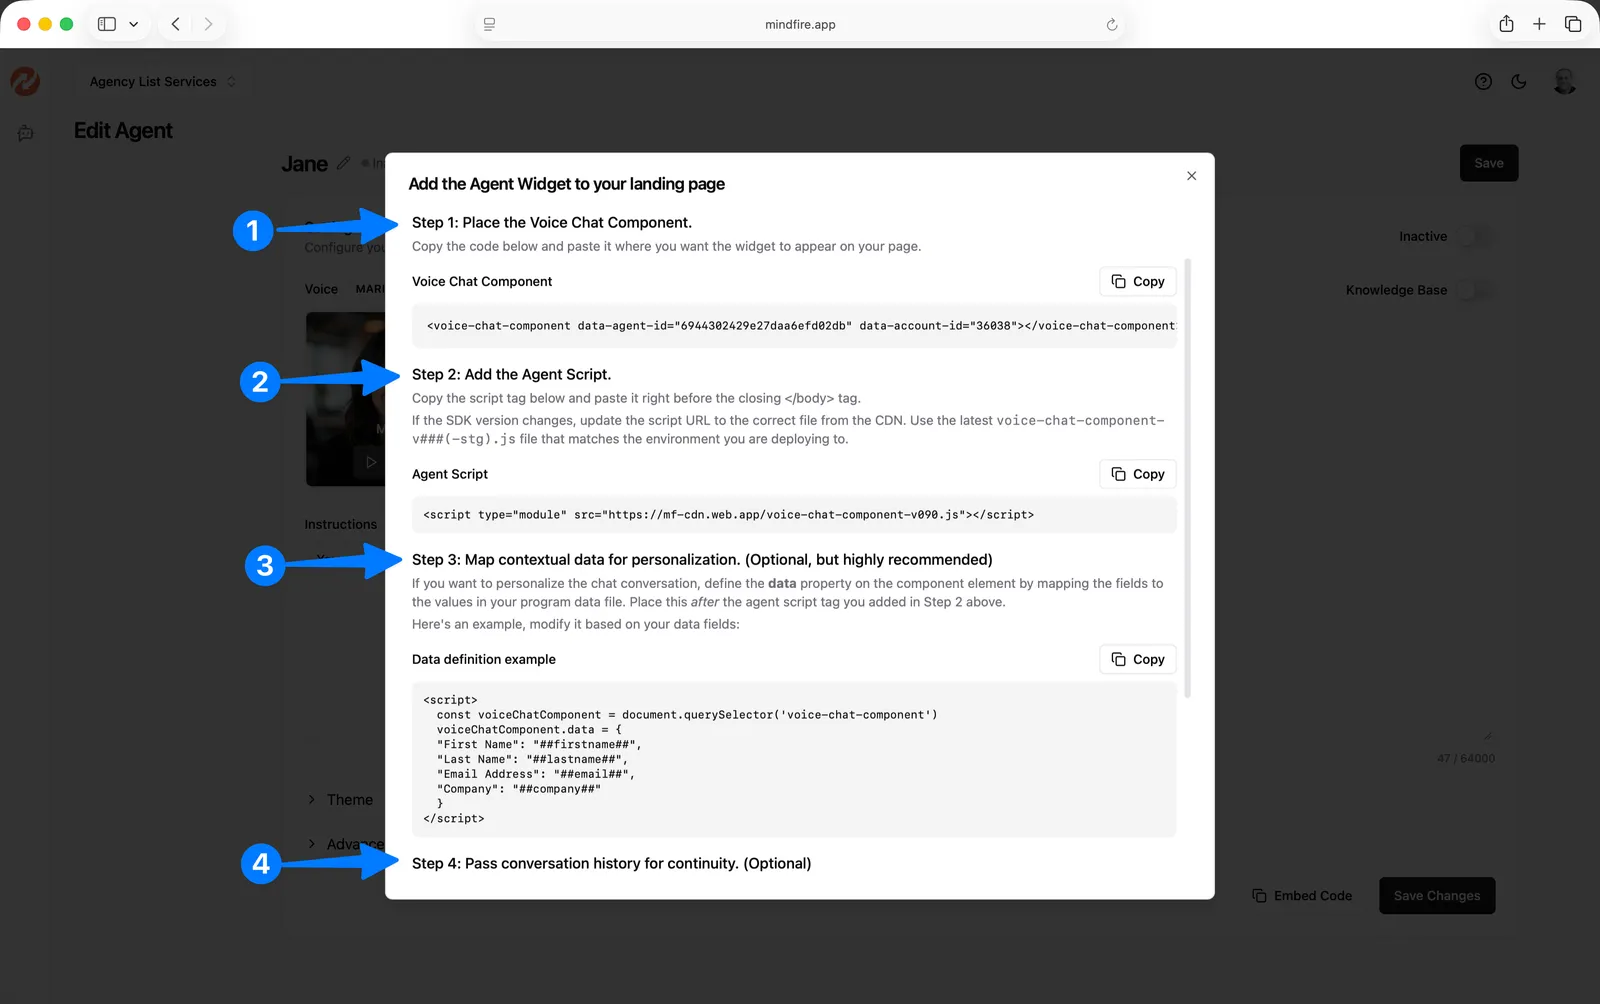
The current Voice Chat SDK v1.0.0 script is:
<script type="module" src="https://mf-cdn.web.app/voice-chat-component-v100.js"></script>WARNING
- The widget only loads on secure sites using
https://. - The page’s domain must be included in the agent’s
Allowed Domains.
INFO
Voice Chat SDK v1.0.0 sends sdk_version=v100 when requesting the realtime token and uses the realtime_model returned by the agent configuration. Older pinned SDK scripts continue to use their pinned behavior until the embed script is updated.
Passing contextual data
Use the data property to give the agent information about the current context — visitor details, product specs, listing info, account data, or anything else relevant to the conversation:
<script>
  const voiceComponent = document.querySelector('voice-chat-component');
  voiceComponent.data = {
    name: "Jane Smith",
    email: "jane@example.com",
    propertyAddress: "123 Main St"
  };
</script>
Passing conversation history
Use the history property to give the agent memory of prior sessions. Pass a JSON object or array containing previous conversation summaries or transcripts:
<script>
  voiceComponent.history = [
    {
      date: "2025-01-15",
      summary: "User asked about 3-bedroom listings in Austin. Was interested in properties under $500k."
    }
  ];
</script>
When present, the agent uses this history to personalize its responses and avoid repeating itself across sessions.
Tracking voice chat events
The Voice Chat Component emits DOM events that other scripts can listen to. The v1.0.0 SDK adds consent events for accepted and declined prompts:
const voiceComponent = document.querySelector('voice-chat-component');

voiceComponent.addEventListener('voice.consent.accepted', (event) => {
  console.log(event.detail);
});

voiceComponent.addEventListener('voice.consent.declined', (event) => {
  console.log(event.detail);
});
The accepted event detail includes:
{
  "account_id": "36038",
  "agent_id": "6939b1f2fa486d985bff76ae",
  "sdk_version": "v100",
  "consent_enabled": true,
  "consent_message": "By selecting Agree...",
  "accepted_at": "2026-06-02T18:30:00.000Z",
  "page_url": "https://example.com/page"
}
The declined event detail includes:
{
  "account_id": "36038",
  "agent_id": "6939b1f2fa486d985bff76ae",
  "sdk_version": "v100",
  "consent_enabled": true,
  "consent_message": "By selecting Agree...",
  "declined_at": "2026-06-02T18:31:00.000Z",
  "page_url": "https://example.com/page"
}
accepted_at and declined_at are generated by the visitor’s browser. If you persist these events, your persistence system should also store its own received timestamp.
INFO
To track agent interactions with visitors, persist consent events, and record the voice conversation, add the following script to the bottom of your landing page:
<script src="https://mfdavinci.s3.us-west-1.amazonaws.com/js/event-persistent-script.js"></script>Troubleshooting
- Widget doesn’t show up on my site
- Confirm your page is
https://(nothttp://). - Confirm the domain host is in
Allowed Domains. - Confirm the agent is
Active.
- Confirm your page is
- Can’t activate the agent
- Add at least one allowed domain.
- If
Zapier MCPis enabled, fill all required tool fields.
- Can’t delete an agent
- Agents must be
Inactivebefore they can be deleted.
- Agents must be